October, A Month of Ink: Using Graph Paper with Your Daily Challenge
Every October, a great many artists commit to one ink drawing a day for the whole month. The best known of these challenges is Inktober, which Jake Parker started in 2009 as a personal challenge to get better at inking and build a drawing habit, and its rules are short: make a drawing in ink, post it, and keep going. You can post daily, every other day or weekly, as long as the pace is consistent. The rules also allow a pencil under-drawing, and that is where graph paper earns its place. Ink cannot be erased, so a drawing is only ever as good as the plan underneath it, and a printed grid makes that plan faster to build: proportions come from counting squares instead of measuring, straight edges follow the ruling, and a whole month of ideas fits on one sheet. This article covers which grid suits which kind of subject, how to thumbnail the month before it starts, how to scale a thumbnail up to a finished drawing, the paper that takes ink without a fight, and how to keep the grid out of the drawing you finally scan.
Why Ink Wants a Grid Underneath
Pencil forgives and ink commits. A proportion that is slightly off in graphite is a thirty-second fix; the same mistake found after inking is a drawing started over, and on a daily schedule there is rarely time for that. The practical answer is to move every decision that can go wrong into the pencil stage, where changing your mind is free, and to treat inking as the moment you carry out a plan rather than make one.
A grid is what makes the pencil stage quick. A head two squares tall on a body five squares tall stays in that ratio without a ruler. A symmetrical vase is drawn about one grid line and mirrored by counting outward. Six windows on a building come out the same size because each one covers the same squares, and a horizon stays level because it sits on the ruling. None of those lines are inked. The grid is scaffolding, and it comes down once the drawing stands.
It is also exactly the technique behind the grid method for copying and enlarging drawings, which this article leans on later to turn a small thumbnail into a full-size piece. If a ruled square grid feels too busy under loose, organic subjects, dot grid paper gives the same reference points with far less printed ink competing with yours.
Pick the Grid by Subject
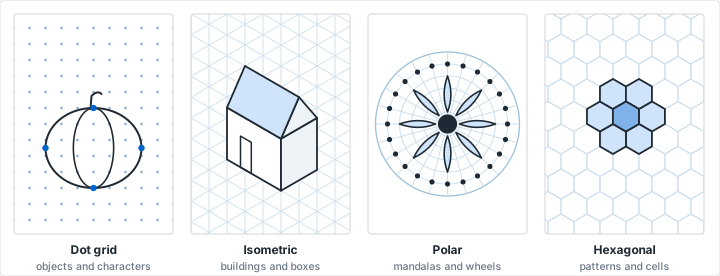
The subject decides the grid, and the useful question is what the drawing is built from. Most daily prompts fall into one of four answers.
Proportions: dot grid. Objects, animals and characters are mostly curves, and ruled lines fight a curve all the way round. A dot grid gives you the landmarks without the lines. Decide the extremes first. The pumpkin in the figure is six dots wide and five tall, so mark those four dots and draw the curves between them freehand. At 5 mm spacing the dots are close enough to plan with and far enough apart to disappear once the ink is down.
Three axes: isometric. Houses, furniture, boxes, stairs, a desk seen from above: anything with square corners reads best on isometric graph paper, where every edge follows one of three printed directions and there is no vanishing point to place or keep consistent. That matters more than usual in ink, because a perspective error cannot be quietly corrected after the fact. Our article on isometric drawing for trade drafting and game art goes deeper into the projection itself.
A center: polar. Mandalas, flowers, clock faces, wheels and compass roses all radiate from a single point, and polar graph paper prints that point with its rings and radials already in place. Set the radials to the symmetry you want: 8 radials for an eight-petal flower, 24 when you want a finer ring of detail around it. Every petal then lands on a printed line, so the eighth one matches the first.
A repeating cell: hexagonal or square. Honeycomb, fish scales, tiled floors, chainmail and woven patterns are one cell repeated, and hexagonal graph paper gives you that cell ready-made for anything six-sided. For checkerboards, brickwork and stitched or pixel-style drawings, stay on a square grid and fill whole squares with ink, the same one-square-one-mark discipline as pixel art on graph paper.
Plan the Month on One Sheet
The daily part of a daily challenge is what wears people down, and most of that friction is deciding what to draw with the pen already in your hand. If you are following a published prompt list, you already have all of the month's subjects before it begins; if you are writing your own, write them now. Either way, the most useful hour of the whole month is the one you spend before the first day, roughing out every drawing as a thumbnail on a single sheet.
Building the Thumbnail Sheet
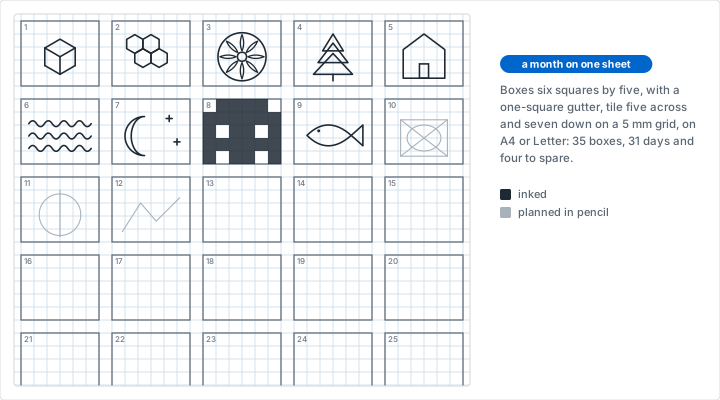
Print a square grid at 5 mm on A4 or Letter. Rule boxes six squares wide by five tall, with one empty square between neighbors, and you can fit five across and seven down: 34 squares, or 170 mm, of width and 41 squares, or 205 mm, of height, which sits inside the printable area of both paper sizes. That is 35 boxes for 31 days, with four left over for the prompts that refuse to come right the first time. Number the boxes before you start.
Give each thumbnail a few minutes in pencil and no more. The point is the composition, not the detail: where the subject sits in the frame, how big it is, and which grid style it needs. With the whole month in view at once, problems show up that a day-by-day approach never sees: five creatures in a row, three drawings that all put the subject dead center, a week with nothing but straight lines. Move them around now, while it costs an eraser.
Match the box to the page the final drawing is going on. Six by five suits a landscape-ish frame; if your sketchbook is square, rule the boxes five by five, and if you are drawing on portrait pages, turn them to five by six. A thumbnail in the wrong shape plans a composition that will not fit.
Thumbnail First, Then Scale Up
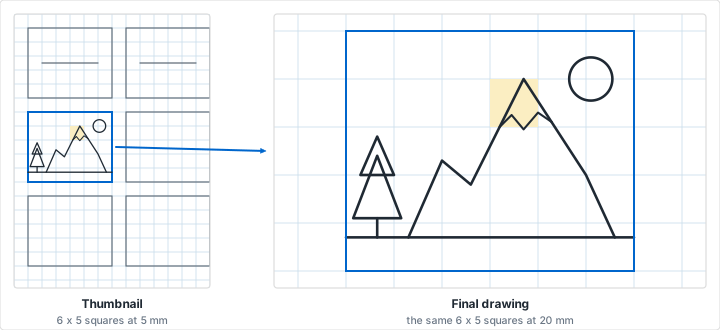
Because the thumbnail was drawn on a grid, enlarging it is a matter of counting rather than eyeballing. Give the final drawing the same number of squares, only larger. Six by five squares at 20 mm is a 120 by 100 mm drawing, four times the size of the thumbnail, and it fits comfortably on an A5 page. Then copy one square at a time: whatever crosses a square in the thumbnail crosses the matching square in the enlargement, at the same place along its edges.
You can put the larger grid on the final page in three ways. Print it at 20 mm directly onto the paper you are inking on. Rule it lightly in pencil onto a sketchbook page and erase it with everything else. Or print it on a separate sheet and lay your drawing paper over it on a light pad, which leaves no grid on the finished drawing at all. Our full guide to the grid method covers the scaling ratios and the mistakes that quietly distort a transfer.
Pencil Under, Ink Over
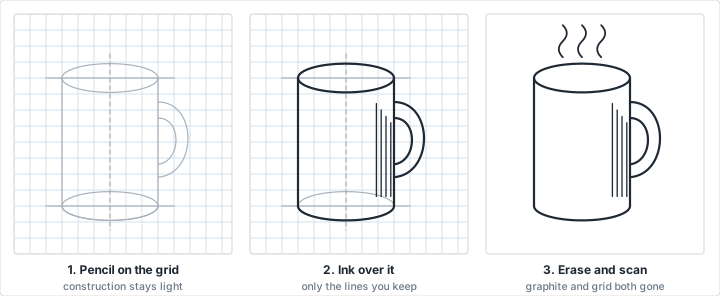
Work in three distinct passes and keep them separate. First, construct in light pencil: the centerline, both ellipses of a cylinder drawn all the way round even though you will only see the front of one, the box a figure fits inside. A hard lead such as an H or 2H keeps the lines faint and erases cleanly; press lightly enough that the line does not dent the paper, because a dented groove catches ink and stays visible after erasing.
Second, ink only the lines the finished drawing keeps. Use a heavier nib for outlines and a finer one for interior detail and hatching; a multi-size set of pigment fineliners makes that easy to keep consistent from day to day. The construction you do not ink is not wasted. It is why the lines you did ink are in the right place.
Third, let the ink dry completely before erasing. Pigment fineliners dry quickly on ordinary paper, but give them a minute or two, longer on smooth stock, and longer still for brush pens and dip pens. Erase with a kneaded eraser pressed and lifted rather than scrubbed, which pulls the graphite off without dragging across the ink or roughing up the paper.
Paper That Takes Ink
Ordinary 20 lb (75 gsm) copy paper is fine for fineliner thumbnails and poor for anything wetter. Brush pens and felt-tip markers feather along its fibers, turning a crisp edge fuzzy, and they bleed through to the next sheet. A heavier printer paper around 32 lb (120 gsm) runs through most home printers and takes brush pen and heavy hatching far better, which makes it the easiest upgrade for a month of printed grids.
If you plan to add water, such as a water brush over water-soluble ink or a gray wash, check what printed the grid first. Many inkjet inks, color inks especially, are water-soluble and will run into the wash; laser toner does not. On an inkjet, keep washes off the printed sheet and draw over the grid on a light pad instead.
Making the Grid Disappear
The grid helped you plan; it should not be in the drawing you share. The simplest fix happens before you print. Choose a pale blue for the line color and a light line weight in the generator. Pale blue is the traditional non-photo blue of comic book penciling, picked because old reproduction cameras could not see it, and it still separates cleanly from black ink today: in a scan or phone photo, keep only the blue channel, or raise the levels until the paper goes white, and the grid goes with it while the ink stays black.
Avoid printing the grid in gray or black if you plan to scan. A gray line and a gray pencil stroke look identical to image software, so there is nothing to separate them by, and the only way to remove the grid then is by hand. The alternative that needs no editing at all is the one from the previous section: keep the grid on a separate sheet under your drawing paper, on a light pad or against a bright window, and the finished page never has a grid on it to remove.
Prompt Families That Suit a Grid
Whether the subjects come from a published list or your own notebook, they tend to fall into a handful of families, and spreading them across the month keeps both the drawings and the grids varied. A week built on one family also makes a pleasing set when the drawings are shown together.
- Structures. A tower, a cabin, a bookshelf, a staircase. Isometric paper, and a good week to practice line weight on edges that face the light versus those in shadow. If a prompt is a room seen from above instead, the room layout tutorial covers drawing one to scale.
- Patterns and textiles. Scales, lace, a knitted sweater, a patchwork quilt. Hexagonal or square paper; our articles on quilt block design and cross-stitch and knitting charts are full of grid patterns worth inking.
- Radial subjects. Flowers, a clock, a rose window, a spider's web. Polar paper, with the radials set to the symmetry you want.
- Creatures and characters. Dot grid, with proportions marked on the dots before any curve goes down.
- Maps and places. An island, a village, a cave system. Square or hex paper; the conventions in drawing tabletop RPG maps translate directly to a single inked page.
- Words. The day's prompt lettered as the drawing itself. Square grid for the guidelines, and the techniques in calligraphy and hand lettering on graph paper.
Choosing Your Grid Size
| What you are drawing | Grid | Size |
|---|---|---|
| The month's thumbnail sheet | Square | 5 mm |
| Objects, animals and characters | Dot | 5 mm |
| Buildings, furniture and boxes | Isometric | Coarse enough that an edge is a few triangles long |
| Mandalas, flowers and wheels | Polar | 8 radials for petals, 24 for fine detail |
| Honeycomb, scales and tiles | Hexagonal | One cell per repeat of the pattern |
| A final drawing scaled from a thumbnail | Square | The thumbnail's square size times the enlargement, such as 20 mm for 4x |
Whichever you choose, print at 100 percent with page scaling turned off, so a 5 mm square on the thumbnail sheet is really 5 mm and the enlargement comes out at the ratio you planned.
Mistakes That Show Up in Ink
Mistake: A Gray or Black Grid Under a Drawing You Will Scan
Problem: The grid prints in the same neutral tone as graphite and ink. In the scan, nothing distinguishes a grid line from a drawn one, so the grid can only be removed by hand, one line at a time.
Solution: Print the grid in pale blue at a light line weight, and drop it out with the blue channel or a levels adjustment. Or keep the grid on a separate sheet under the drawing.
Mistake: Erasing Before the Ink Has Dried
Problem: The eraser drags wet ink across the page, leaving a gray smear through the drawing that cannot be taken back out.
Solution: Wait longer than feels necessary, especially on smooth paper or after brush pen, and use a kneaded eraser pressed and lifted rather than rubbed.
Mistake: Brush Pen on Thin Copy Paper
Problem: A grid printed on 20 lb copy paper takes a fineliner well enough, but a brush pen feathers along the fibers and bleeds through, and a wash lifts inkjet grid lines into the drawing.
Solution: Print on heavier paper for wet media, or keep the printed grid under the drawing paper instead of on it.
Mistake: Planning One Day at a Time
Problem: Each evening starts with a blank page and no idea, the drawing gets rushed, and after a few missed days the challenge quietly stops.
Solution: Thumbnail the whole month on one sheet before the first day, so every session starts from a plan that already works.
Conclusion
A month of daily ink drawings is a test of habit more than talent, and the habit that makes it sustainable is planning in pencil before committing in ink. A printed grid speeds up every part of that plan: the right grid for the subject turns proportions, symmetry and repetition into counting, a single thumbnail sheet puts the whole month in view before it starts, and the same grid scales a thumbnail up to a finished drawing square by square.
Print the grid pale, ink only what the drawing keeps, and let the scaffolding come down afterward. What is left on the page is just the drawing, which is the only part anyone else will ever see.
Print a Grid to Ink Over
Pick the grid style for the day's subject, set a pale blue line color and a light weight, and print at 100 percent. Free, with no account and nothing to install.
Create Your GridRelated Resources
- The Grid Method for Drawing: scaling a thumbnail up square by square
- Dot Grid Paper: landmarks for loose, curved subjects without ruled lines
- Isometric Graph Paper: buildings and objects with no vanishing point to manage
- Polar Graph Paper: mandalas and radial designs built on printed radials
- Hexagonal Graph Paper: honeycomb, scales and six-sided patterns
- Creating Pixel Art on Graph Paper: one square, one mark, in ink as well as color
- Calligraphy and Hand Lettering on Graph Paper: for the days the prompt is a word
- Screen-Free Projects on Graph Paper: more things worth making by hand
Inktober is a trademark of Jake Parker, owned through J.P. Creative, LLC. Graph Paper Generator is independent and is not affiliated with, sponsored by or endorsed by Jake Parker, J.P. Creative, LLC or Inktober. The name is used here only to identify the challenge. The official rules and each year's prompt list are at inktober.com.