Paper Snowflakes on Polar Graph Paper: Six-Fold Symmetry That Folds and Cuts
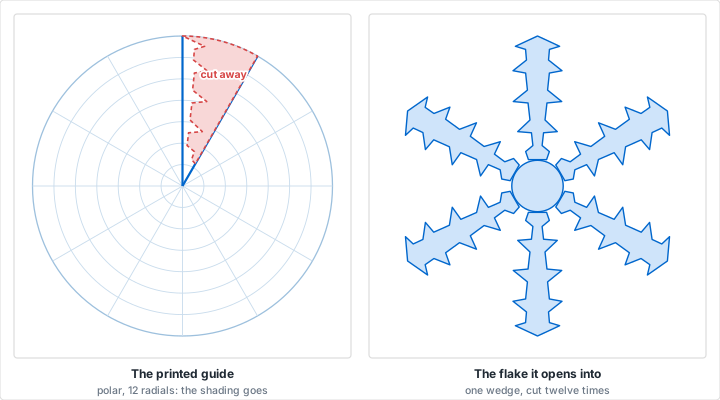
Almost every paper snowflake made at a kitchen table has eight points, because almost every set of instructions starts with a square folded in half, in half again, and in half once more. A real snow crystal has six. Getting six out of paper means dividing a circle by six rather than halving a square, and dividing a circle by six is exactly what a printed polar grid does for you: twelve radials land on the twelve fold lines, and the rings number the distance from the center so a pattern can be written down and cut again. This article covers the settings for the fold guide, how to fold a circle into twelve layers on the printed lines, how to draw the one wedge that becomes the whole flake, the rule that keeps it from falling into pieces when it unfolds, and how to cut a stack that thick without tearing it.
Why Real Snowflakes Have Six Arms
Water freezes into a crystal whose molecules sit on a hexagonal lattice. A growing snow crystal picks up water vapor fastest at the six corners of that lattice, so the branches that grow out of a small plate come out at 60 degrees to each other, and every branch that forks off a branch does the same. The result is a crystal with six-fold rotational symmetry: turn it a sixth of a turn and it looks the same. Needles, columns and plain plates form too, depending on temperature and humidity, and twelve-armed crystals turn up when two of them grow joined face to face at 30 degrees. What almost never happens is four arms or eight.
A square folded in half gives two layers, folded again gives four, and again gives eight. Cut through eight layers and the result has eight points, or four if you stop a fold early. There is no number of halvings that produces six, which is the whole reason the kitchen-table snowflake looks wrong next to a photograph of the real thing.
Six comes from a circle. One sixth of a full turn is 60 degrees, and half of that is 30, so a circle divided into twelve equal sectors of 30 degrees can be folded into twelve layers: six arms, each one mirrored about its own center line. That is the arrangement a real crystal has, and it is what the rest of this article builds. The same equal-angle problem is why polar graph paper exists at all, and why a six-sided figure is awkward on square paper and natural on hexagonal graph paper, where the hexagon is the printed cell.
Print the Fold Guide
In the generator, set the grid style to polar, the measurement system to imperial, the grid size to 0.5 inches, the paper size to Letter, and the number of radials to 12. The grid size is the spacing between rings, not a square size. Twelve radials sit 30 degrees apart, which puts them on the hour marks of a clock face, and those twelve lines are every fold line a six-armed flake needs.
The generator centers the polar grid on the sheet and fills it with as many whole rings as fit. On Letter at half inch spacing that is seven rings, with the outermost at 3.5 inches from the center, so the circle you cut out is 7 inches across. The radials carry on a quarter inch past that last ring, which is useful rather than untidy: where each radial crosses the outer ring is a tick mark on the rim of your circle, and those twelve ticks are what you match up when you fold.
Ring Spacing and the Size of the Finished Flake
The flake comes out as wide as the circle you cut, so pick the ring spacing for the detail you want and the paper size for the diameter:
- Letter, half inch rings: 7 rings, a 7 inch flake. Rings this far apart are easy to count across a room, which makes this the sheet to start on.
- Letter, quarter inch rings: 15 rings, a 7.5 inch flake. Twice the resolution for describing where a branch starts, and the one to use for a lacy design.
- A4, 10 mm rings: 9 rings, an 18 cm flake. Switch the measurement system to metric first, then the paper size, then the grid size.
- Tabloid, half inch rings: 10 rings, a 10 inch flake, for a window.
- A3, 10 mm rings: 13 rings, a 26 cm flake.
Print at 100 percent with page scaling turned off, or the rings will not be the spacing you asked for and the ring numbers in your pattern will mean nothing. The printing tips guide has the settings for each common browser. Ordinary copy paper is the right stock here. Heavier paper makes a cleaner flake and a much harder cut, and you are about to be cutting through a dozen layers of it.
Keeping the Grid Off the Finished Flake
The guide is printed in blue at 60 percent opacity, which is faint but not invisible, and a flake cut straight out of the sheet carries rings and radials across it. Three ways around that, in order of effort:
- Print the lines pale. Set the line color to a custom light gray before printing. The fold lines stay findable while the paper reads as white from more than a foot away.
- Turn the printed side away. Make the first fold with the grid facing out, cut the flake, and hang it with the printed face against the window. From inside the room you see the clean side.
- Use the guide as a template. Cut one flake from the printed sheet, then open it out and draw around it onto plain paper for every flake after that. Or lay plain paper over the wedge and trace the pattern through on a light pad, which is the cleaner route if you want a dozen identical flakes for a garland.
Fold the Circle Into Twelve Layers
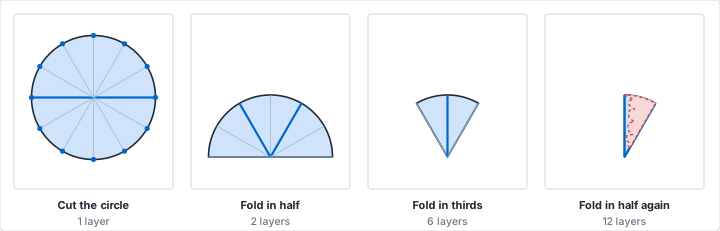
Everything about the fold is easier if you mark it first. The printed lines will be face down for at least one of the folds, so put the information on the rim where you can always see it.
- Go over four lines in pencil. The full diameter from 9 o'clock to 3 o'clock, the radials at 1 o'clock and 11 o'clock, and the radial at 12 o'clock. Those four creases, in that order, are the whole fold.
- Cut out the circle along the outermost ring, and tick the rim where each of the twelve radials meets it before the stubs are gone.
- Fold in half along the 9 to 3 diameter, printed side out, taking the 6 o'clock half behind so its tick meets the 12 o'clock tick. You now have a half circle, two layers thick, arc upward, with the center of the flake at the middle of its straight edge and the radials to 10, 11, 12, 1 and 2 o'clock in front of you.
- Fold the right third over. Bring the right-hand end of the straight edge up and across until its tick lands on the 11 o'clock tick. The crease falls on the 1 o'clock radial.
- Fold the left third over the top of it, so its straight edge lies along the folded edge you just made and its tick lands on the 1 o'clock tick. The crease falls on the 11 o'clock radial. Six layers, a wedge 60 degrees wide.
- Fold the wedge in half along the 12 o'clock radial. Twelve layers, a wedge 30 degrees wide, and the pattern you draw on it will be repeated twelve times.
Press every crease hard with a thumbnail or the back of a spoon as you go. A soft crease lets the layers creep, and layers that have crept mean the arms come out slightly different lengths. If the wedge will not sit flat, unfold to the half circle and start the thirds again: that is the fold that goes wrong, and it is quick to redo.
Stopping at step 5 is a legitimate choice. Six layers of copy paper cut far more easily than twelve, and a flake folded in six still has six arms. What it loses is the mirror symmetry inside each arm, so a branch cut on one side of an arm will not have a twin on the other. Real crystals are mirrored, which is why the extra fold is worth the extra effort when the paper is thin enough to take it.
Draw the Pattern on One Wedge
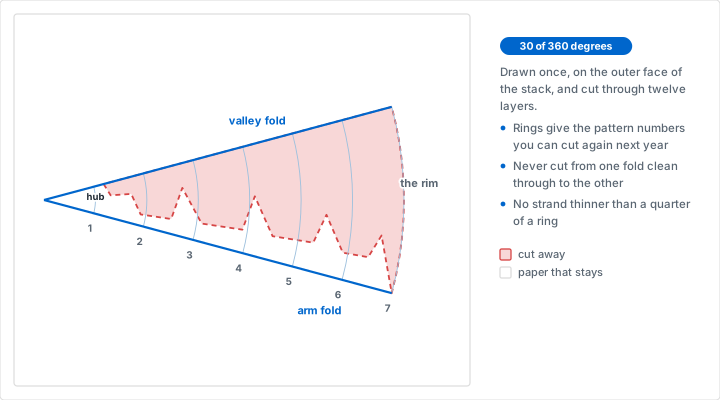
Draw on the outer face of the folded stack, in pencil, lightly. Every line you draw will be cut through twelve layers, so a wrong line costs you the whole flake rather than a corner of it.
The Three Edges of the Wedge
The wedge has three edges and each one becomes something different in the finished flake:
- The arc, the curved edge that was the rim of the circle. Paper left here becomes the outer tips. Cut the arc into a point and the arms end in points; leave it alone and the flake has a round outline.
- One straight fold becomes the center line of an arm. Whichever fold you leave paper along, out to the arc, is the one the arms grow down. Cuts made off this edge appear as matched pairs, one on each side of the arm.
- The other straight fold becomes the valley between two arms. Paper cut away here is what separates one arm from the next, so this is the edge to be bold with. Cut deeply into it and you get six slender arms; barely cut it and you get a hexagonal plate with a decorated edge.
The apex of the wedge is the center of the flake, where all twelve layers meet. Leave the paper inside the first ring uncut and the flake has a solid hub holding the arms together. Cut the apex off and you have six separate arms and a hole where the middle should be.
Counting Rings Instead of Measuring
This is what the printed guide buys you beyond the folds. A pattern described as "a pair of spurs at ring 3, a longer pair at ring 5, and the tip split at ring 7" can be cut again next year, taught to somebody across a table, or scaled onto the quarter inch sheet by doubling every ring number. A pattern described as "some spikes about two thirds of the way out" cannot.
Write the ring numbers down as you draw. If you want to work the design out before committing to the folded stack, sketch it on a flat printed sheet first, inside one 30 degree sector, which is the same thumbnail-then-full-size habit that runs through design sketching on graph paper and through the grid method for drawing. A sketch is cheap. A stack of twelve layers cut wrong is not.
The Rule That Keeps the Flake in One Piece
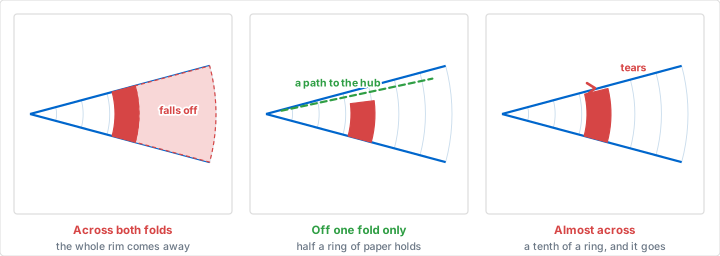
Never cut all the way across the wedge from one fold to the other. A cut that reaches both straight edges severs everything beyond it, and the flake unfolds as a center and a separate loose ring. This is the same rule that keeps a carved pattern from dropping out of a pumpkin, where it goes by the name of bridges, and the test for it is the same: put a pencil point anywhere on the paper you mean to keep and trace a path to the apex without crossing a cut. If there is no path, that piece is going on the floor.
The second rule is about width. A strand of paper narrower than about an eighth of an inch tears while the flake is being unfolded, and it tears at a crease, which is the worst place because the tear runs. On a half inch guide, an eighth of an inch is a quarter of a ring, so the working rule is that no strand is thinner than a quarter of the gap between two rings. On a quarter inch guide it is half a ring. Err wider at the hub, where six arms are pulling on the same paper, and feel free to go finer out at the tips, which carry nothing.
Those two rules together explain why most real-looking paper snowflakes are mostly solid. The paper that survives is a frame; the lace is cut out of it.
Six Patterns to Start With
Each of these is a different answer to one question: how much of the valley fold do you cut away? They are listed from the most solid to the most open.
| Flake | What to cut | Where |
|---|---|---|
| Hexagonal plate | Nothing off either fold, small notches in the arc | Trim the arc straight across between the folds |
| Pierced plate | One hole inside the paper, nothing from any edge | Centered on the wedge at ring 4, a hole punch width |
| Classic star | A deep triangle out of the valley fold | From the arc in to ring 2, the arm fold untouched |
| Spurred dendrite | The valley triangle plus notches off the arm fold | Notch pairs at rings 3 and 5, a quarter ring wide |
| Hexagon frame | A window inside a kept border | Leave half a ring at the apex and at the arc |
| Needle cluster | Almost all of the valley fold | In to ring 1, leaving a strand along the arm fold |
Mandalas work the same way and are drawn on the same sheet, which is why radial designs come up both here and in the prompts for an ink drawing challenge: twelve radials give you equal angles for free, and equal angles are the part a person cannot judge by eye.
Cutting Through Twelve Layers
Twelve layers of 20 lb copy paper is roughly a twentieth of an inch of stack. Household scissors will go through it, but they will not turn a tight corner in it, and the blade wanders between the layers on a long slow cut. Work with that rather than against it.
Paper and Layer Count
Thin paper is the single biggest improvement available. Tracing paper, origami paper and the thin sheets from a pad of newsprint all cut cleanly at twelve layers. Copy paper is happier at six, so if that is what you have, consider stopping the fold one step early. Card stock has no business being folded more than twice.
Order of Cuts
- Shape the arc first, while the stack is still at full strength and you have the most paper to hold on to.
- Cut each notch as two straight cuts meeting at a point, in from the folded edge, rather than as one curving sweep. Scissors cut straight lines well through a thick stack and curves badly.
- Cut the valley fold before the arm fold. The valley cuts remove most of the paper, and doing them first means the arm notches are being cut through a stack you can see the edges of.
- Interior holes need a blade. A hole that touches no edge cannot be started with scissors. Use a craft knife on a cutting mat, keep the hand that holds the stack behind the blade, and change the blade before it starts to drag rather than after.
- A single hole punch is twelve identical dots in one squeeze, and it is the easiest interior hole there is. Punch through the folded stack, not the finished flake.
Unfold, Press and Display
Unfold in reverse order, one crease at a time, and pull the layers apart rather than peeling the flake open from the rim: the thin strands are strongest along their length and weakest across a crease. If something does tear, a small piece of clear tape on the side that will face the window is nearly invisible.
A freshly unfolded flake will not lie flat. Leave it under a stack of books overnight and it will. Then hang it: a loop of thread through a punched hole, or a small piece of tape at three of the six arm tips so the flake sits against the glass instead of curling off it.
Keep a Record of the Settings
Write the ring spacing, the paper size and the pattern on the back of the first good flake of the year, in ring numbers. Six flakes cut from the same guide at the same spacing hang together as a set, and the only way to get a set rather than six unrelated flakes is to have written down what you did. A string of them along a mantel is the same kind of afternoon as the other printable projects of the season, the gingerbread house templates and the coordinate graphing mystery pictures, and it scales the same way: one printed sheet, repeated.
Choosing Your Settings
| What you want | Style and radials | Ring spacing and paper |
|---|---|---|
| A first six-armed flake | Polar, 12 radials | 1/2 in rings, Letter: 7 rings, 7 in flake |
| A lacy, detailed flake | Polar, 12 radials | 1/4 in rings, Letter: 15 rings, 7.5 in flake |
| Metric paper | Polar, 12 radials | 10 mm rings, A4: 9 rings, 18 cm flake |
| A big one for a window | Polar, 12 radials | 1/2 in rings, Tabloid: 10 rings, 10 in flake |
| Six arms, no mirror, thicker paper | Polar, 12 radials | Any spacing, fold three times for 6 layers |
| An eight-pointed star, cut from a circle | Polar, 8 radials | 1/2 in rings, fold three times for 8 layers |
| A twelve-armed crystal | Polar, 24 radials | 1/4 in rings, fold to 12 layers of 15 degrees |
The last row is worth a note. Twenty-four radials put a line every 15 degrees, so folding to twelve layers gives wedges half as wide and a flake with twelve arms rather than six. It is a real crystal form and it looks spectacular, but each wedge is narrow enough that the strand width rule bites hard, so use the quarter inch spacing and keep the design simple.
Mistakes That Ruin a Snowflake
Mistake: Folding a Square in Half Three Times
Problem: Eight points, or four, and a flake that reads as a star rather than a snow crystal. No amount of careful cutting fixes it, because the error is in the fold.
Solution: Fold a circle, not a square, and fold it into twelve sectors of 30 degrees on the printed radials. Six is not a power of two, so it cannot come out of halving.
Mistake: A Cut That Crosses Both Folds
Problem: The scissors run from one folded edge clean through to the other. It feels like a bold design decision. It unfolds as a small hexagon and a loose ring of arms with nothing joining them.
Solution: Before cutting, trace a path from every part of the pattern you mean to keep back to the apex without crossing a cut line. No path means no flake.
Mistake: Strands Too Thin to Unfold
Problem: The design looks like frost on the folded wedge, then tears in three places as it opens, every tear starting at a crease.
Solution: Nothing narrower than a quarter of the ring spacing, which is an eighth of an inch on the half inch sheet. Measure the narrowest strand against the rings before you cut, not after.
Mistake: Cutting the Apex Off
Problem: The point of the wedge gets trimmed to make the arms look separate, and the flake unfolds into six detached arms around a hole.
Solution: Leave everything inside the first ring alone. That disc is the hub the whole flake hangs from, and on the half inch sheet it is only an inch across to begin with.
Conclusion
A paper snowflake is a geometry problem with scissors. The hard parts are dividing the circle into six equal arms and keeping the result in one piece, and a printed polar sheet solves the first outright: the twelve radials are the fold lines, and the rings turn a vague design into a list of numbers you can cut again.
Print the guide, pencil the four fold lines, cut the circle, fold it twice into thirds and once in half, and draw one wedge. Trace a path from every kept piece back to the center, keep no strand thinner than a quarter ring, and cut the valley before the arms. It is a good hour at a table with the screens off, which is most of the appeal of the projects that start on a printed grid, and it comes with the small satisfaction that yours has the right number of arms.
Print a Snowflake Fold Guide
Polar paper with 12 radials and half inch rings on Letter: seven rings, a 7 inch circle, and every fold line already drawn. Free, with no account and nothing to install.
Create Your Fold GuideRelated Resources
- Polar Graph Paper: ring spacing, radial counts and what else the sheet is for
- Hexagonal Graph Paper: the six-sided tiling an ice crystal grows on
- Pumpkin Carving Patterns on Graph Paper: the same keep-it-attached rule, on a curved surface
- Gingerbread House Templates on Graph Paper: the other December build that starts as a printed sheet
- October, A Month of Ink: mandalas and radial designs drawn over printed radials
- The Grid Method for Drawing: scaling a small design up without redrawing it
- Coordinate Graphing Mystery Pictures: why a six-sided figure will not land on square paper
- Cross-Stitch and Knitting Patterns: charting a snowflake motif on squares instead of cutting one
- Visual Math Activities on Graph Paper: symmetry, tiling and more classroom work on a printed grid
- Design Sketching on Graph Paper: working an original design up from a thumbnail