Gingerbread House Templates on Graph Paper: Design, Size and Cut Your Own
A printed gingerbread house template was drawn for somebody else's baking sheet. Either the pieces are too big for the tray, or the roof panels turn out an inch short of the gable they are supposed to cover, and the first time anybody finds out is when the walls are already baked and cooling. Drawing your own on graph paper fixes all of that before the oven is on, because a gingerbread house is small enough to draw at actual size: there is no scale to convert and no arithmetic to get wrong, just squares to count. This article covers the square size to print, the footprint and wall heights of a worked example, a gable whose roof slope lands exactly on a grid line, roof panels sized to that slope rather than to the wall, where doors and windows weaken a piece, a layout plan that proves the six pieces fit one tray, and the test piece to bake before you commit the batch.
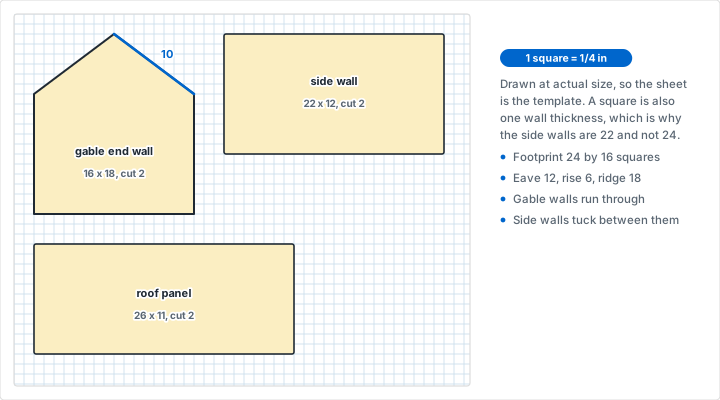
Draw the Template at Full Size
Almost every other plan on this site is a scale drawing: one square stands for a foot of floor, or an inch of board, or a mile of coastline. A gingerbread house does not need that. The whole thing fits on a sheet of paper, so draw it at actual size and the template is the drawing. Cut it out and it is already the right shape.
That decides the square size for you. Print quarter inch squares in imperial, or 5 mm squares in metric. Both are small enough to place a window precisely and large enough to count across a wall without losing your place. More usefully, each one matches a thickness: gingerbread for a structural house is usually rolled about a quarter inch, or 5 mm, so one square is one wall thickness. Every joint in the plan is then one square wide, and you will see in a moment why that matters.
The square counts in this article are the same in both units. Sixteen squares is 4 inches on quarter inch paper and 8 cm on 5 mm paper, so the same cottage comes out slightly larger in metric and nothing else changes. Pick a unit, print it, and stop converting.
Print at 100 percent with page scaling turned off, or the squares will not measure what you asked for and the template will be quietly wrong by a few percent in every direction. The printing tips guide has the setting for each browser. Inside normal printer margins a Letter sheet holds about 7.5 by 10 inches, which is 30 by 40 quarter inch squares, and an A4 sheet holds roughly 38 by 54 squares at 5 mm. That is one large piece or two small ones per sheet, so expect to print three or four sheets for a house. For a bigger build, switch the paper size to Tabloid or A3 in the generator rather than taping pieces of a template together.
Set the Footprint, the Walls and the Ridge
Four numbers describe a simple gabled house, and all four are counts of squares:
- Footprint: 24 squares long by 16 squares wide. That is 6 by 4 inches, or 12 by 8 cm.
- Eave height: 12 squares, the height of the side walls, so 3 inches or 6 cm.
- Gable rise: 6 squares from the eave line up to the ridge.
- Ridge height: 18 squares, which is simply the eave height plus the rise.
Those give six pieces: two side walls, two gable end walls, and two roof panels. Write the cut list on the sheet as you go, because six pieces is exactly the number at which people start cutting a second copy of a piece they already have and no copy of one they do not:
- Gable end wall, 2 off. 16 squares wide, 12 squares to the eave line, then a point 6 squares above it. Total height 18 squares.
- Side wall, 2 off. 22 squares wide by 12 squares tall. The 22 is not a typo, and the next section explains it.
- Roof panel, 2 off. 26 squares long by 11 squares wide, once the overhang is included. The 11 comes out of the gable, two sections from here.
Which Walls Run Through
Two walls meeting at a corner cannot both be full length, because one of them has to stop against the face of the other. One pair runs through, the other pair tucks between them, and the tucked pair loses one wall thickness at each end. On this paper a wall thickness is one square, so the tucked pair loses two squares.
Let the gable end walls run through and trim the side walls. The end walls stay at their full 16 squares and the side walls drop from 24 to 22. Doing it the other way around would leave the gable walls 14 squares wide, which is 7 squares to the center, and a 7 square half span wrecks the whole-square roof slope that the next section is built on. One pair has to be trimmed. Trim the pair whose dimensions do not matter.
If you roll your dough thinner than a quarter inch, the joint is half a square instead of a square and the side walls come out at 23. That is the only place in this plan where you count in half squares, and it is a good reason to roll to a quarter inch and keep the arithmetic whole.
Rule the Gable so the Roof Lands on a Line
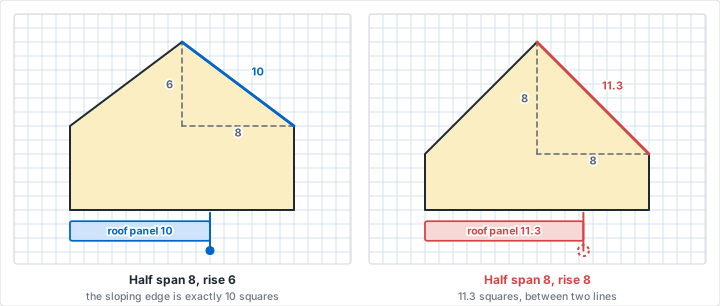
The gable is the piece that decides everything else. Its outline is a rectangle with a triangle on top: 16 squares across, 12 squares up to the eave line, and a peak 6 squares above that on the center line. Rule the center line first, at 8 squares in from either side, and build the triangle off it.
Here is the part worth slowing down for. The sloping edge of that triangle is the line the roof panel has to match, and its length is the hypotenuse of a right triangle whose legs are the half span and the rise. With a half span of 8 squares and a rise of 6, that length is exactly 10 squares, because 8, 6 and 10 is the familiar 3, 4, 5 triangle at double size. The sloping edge starts on an intersection and ends on an intersection, and you can step its length off along any grid line and read it as a whole number.
Choose a rise that keeps that property and the roof panel width is a count rather than a measurement. These are the combinations worth knowing, as half span, rise and the panel width they produce, all in squares:
- 8, 6, 10. The worked cottage: a 16 square house with a moderate roof, about 9 units of rise for every 12 of run.
- 12, 5, 13. A shallow roof on a wider 24 square house, closer to a cabin than a cottage.
- 16, 12, 20. The cottage shape again at double size, for a 32 square house. Every roof figure doubles with it.
- 8, 15, 17. A steep storybook roof on the same 16 square house, with the ridge rising 15 squares above the eaves.
- 20, 21, 29. Tall and steep on a 40 square house, close to 45 degrees without the problem below.
An actual 45 degree roof is the one to avoid. Make the rise equal the half span, 8 and 8, and the sloping edge is 8 times the square root of 2, which is 11.3 squares. It ends between two grid lines, so the panel width cannot be counted and has to be measured with a ruler or rounded up to 12 squares and trimmed after baking. Every combination in the list above is a Pythagorean triple, which is the same property that makes these triangles turn up in the classroom activities in our visual math activities on graph paper. A gingerbread roof is a decent excuse to point that out to whoever is helping.
Size the Roof Panels to the Gable
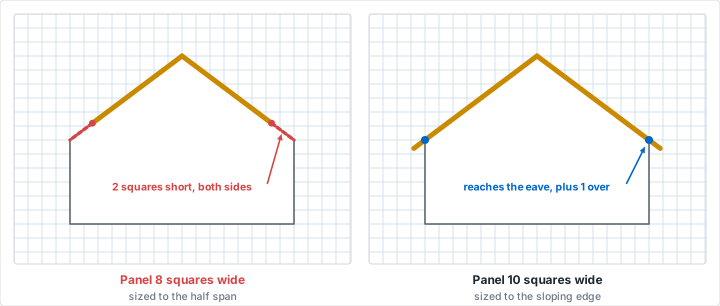
The most common failure in a home-drawn template is a roof panel as wide as the half span. It looks right on paper, since 8 squares is the distance from the ridge to the wall below. It is wrong, because the panel does not travel across the house, it travels down the slope, and the slope is longer than the span it covers. A panel 8 squares wide on this cottage stops 2 full squares short of the eave, which is half an inch of open roof along the entire length of the house, on both sides.
So the rule is short. The roof panel width is the sloping edge of the gable, not the half span. Ten squares on the cottage, from the list above on any other house. Then add what you want hanging over:
- Eave overhang adds to the panel width. One square gives a small shadow line and brings the cottage panel to 11 squares.
- Gable overhang adds to the panel length, at both ends. The house is 24 squares over the outside of the end walls, so one square at each end makes the panel 26 squares long.
- The ridge is where the two panels meet along their long top edges. Either leave both at the same width and fill the seam, or add one square to one panel so it laps over the other and the joint is covered. Decide on paper and mark which panel is the wide one, because two identical panels baked from a template that assumed a lap will not close.
A Chimney Notch Is the Same Triangle
A chimney sitting on a sloping roof needs two of its four sides notched to match that slope, and the notch is the gable triangle again at a smaller size. Draw the chimney side as a rectangle, then from its bottom corner count 8 squares along and 6 squares up, exactly the numbers you used for the roof, and rule the notch between those two points. The angle is identical because the ratio is identical, which is the whole reason to pick the slope in counted squares in the first place. The two chimney sides that face up and down the slope stay rectangles.
Doors, Windows and the Wall You Leave Behind
An opening is a piece of wall you are taking out, and every wall is load bearing in a building made of biscuit. The grid makes the margins easy to hold to:
- Leave at least 2 squares between an opening and any outside edge of the piece. Half an inch of wall along the side of a door is the difference between a wall that survives being lifted upright and one that snaps across the door head.
- Leave at least 2 squares between two openings. Two windows with a single square between them bake as one window with a crumb in the middle of it.
- Keep the bottom rail. A door drawn right down to the base line leaves the wall as a bridge over a gap. Stop the opening 2 squares above the base, or accept that the wall is in two halves below the door head.
- Cut openings before baking, while the dough is cold and the template is still on it. A window cut into a baked wall is a broken wall.
This is the same structural question that governs a carved design, and it is worth reading the section on bridges in our article on pumpkin carving patterns if a wall is getting ambitious: anything left completely surrounded by an opening has nothing holding it. Lettering is the usual offender here too. If a name or a house number is going on the gable, set it out on the grid the way our guide to hand lettering on graph paper describes, and pipe it on rather than cutting it out.
Lay the Pieces Out on the Baking Sheet
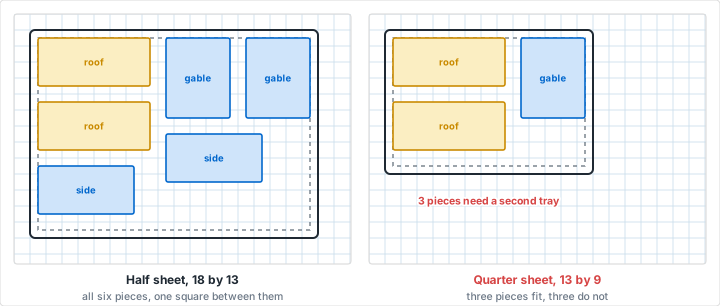
Six pieces at full size come to more paper than most people expect, and whether they fit one tray is not a thing to find out with rolled dough in front of you. So draw a second plan, on the same quarter inch paper, at a different scale: one square is one inch of baking sheet. Write that scale at the top of the sheet in capitals, because a layout plan mistaken for a template is a wasted batch.
Measure your own tray, since pan sizes vary. A half sheet pan is about 18 by 13 inches and a quarter sheet about 13 by 9, so at this scale they are 18 by 13 squares and 13 by 9 squares. Draw the pan, then come in half a square all round for the border you cannot bake into, and draw each piece as the smallest rectangle that contains it, rounded up to whole squares: 6 by 3 for a side wall, 4 by 5 for a gable, 7 by 3 for a roof panel. Leave one square between neighbors so the pieces do not grow into each other.
The cottage fits a half sheet pan in two blocks. Put both roof panels and one side wall in a column 7 squares wide down the left, which comes to 11 squares tall with the gaps. Put the two gables side by side in the 9 squares of width left over, with the second side wall under them. Those six rectangles total 118 square inches inside a usable 17 by 12, and they fit with room to spare. On a quarter sheet pan they do not: three pieces go on the first tray and three on the second, which is useful to know in advance so the two trays can be rolled to the same thickness in one session.
If a bigger house pushes the layout past one sheet of paper, print the plan on engineering graph paper instead and count the pieces off in fives rather than ones. The same approach as any other sheet-goods problem: this is a cut list and a cutting diagram, drawn the way our article on woodworking plans on graph paper draws them for plywood, and the reason for doing it is the same in both. Paper is the cheap place to find out that the plan does not fit.
Cut the Templates and Bake One Test Piece
Print the finished template sheets, then trace each piece onto card stock and cut that out rather than using the printed sheet itself. Thin paper curls against cold dough, and a template gets laid down at least six times. Card stock keeps a crisp edge through the whole batch and can be kept for next year. If you would rather no printed paper touched the dough at all, trace onto parchment, or lay a sheet of parchment between the template and the dough and cut through both.
Label every card piece on the face that goes up with its name, how many you need, and which edge is the ridge or the base. It takes ten seconds and it saves a roof panel baked the wrong way round. Reusable cut templates are the same idea as the piecing templates in our article on quilting design on graph paper, down to writing the quantity on the card.
Dry Fit the Paper Before You Bake
Tape the card pieces into a house. It takes two minutes, and it is the only check that catches a gable 2 squares too narrow for the roof panels, a door that lands behind a side wall, or a chimney notched to the wrong slope. A paper mock-up answers a dimension question faster than any amount of staring at the drawing, which is exactly why paper prototypes come first in our article on designing board games on graph paper. Keep the taped mock-up beside you during assembly as the reference for which piece goes where.
Then Bake One Test Piece
Dough grows a little in the oven, and how much depends on the recipe, the thickness and the tray, so there is no number anyone can give you that is worth trusting over a measurement of your own. Cut one spare rectangle of a known size, say 8 by 8 squares, bake it with the first tray, and lay it on its own template once it is cool. If it matches, carry on. If it has grown, you have two options: trim each piece back to the template with a sharp knife as soon as it comes out of the oven while it is still soft, or redraw the templates smaller by the amount the test piece grew and cut the rest of the batch from those. Trimming hot is quicker. Redrawing is more accurate, and on graph paper it is a matter of moving a line in by a square.
See the Whole House Before You Bake It
Flat templates tell you whether the pieces fit each other. They do not show you the house, which matters if anyone is going to decorate it to a plan. Print a sheet of isometric graph paper and draw the cottage on it: lengths along the three isometric axes are drawn true length, so the 24, 16 and 12 square dimensions transfer straight off the flat template and get counted along the angled lines. Our article on isometric drawing on graph paper covers building a solid this way, and the roof is the one part that needs care, since a sloping surface is not parallel to any of the three axes and its edges have to be plotted from their end points rather than counted along.
With a drawing of the finished house in hand you can plan the decoration as a drawing too: where a candy roofline starts and stops, how many squares of wall a row of windows takes up, whether the path lines up with the door. That is ordinary design sketching, and the techniques in our design sketching tutorial apply unchanged. If you would rather start from a photograph of a real house, scale it up onto the template grid using the method in our article on the grid method for drawing, then simplify it down to pieces a knife can cut in one stroke.
Choosing Your Settings
| What you are drawing | Style and unit | Square size |
|---|---|---|
| Templates at full size, imperial | Square grid, imperial | 1/4 in |
| Templates at full size, metric | Square grid, metric | 5 mm |
| Baking sheet layout plan | Square grid, imperial | 1/4 in, read as 1 in per square |
| A large house or a church | Square grid on Tabloid or A3 | 1/4 in, or 1/2 in for the layout |
| A big layout counted in fives | Engineering, heavy every 5 | 1/4 in |
| The finished house in 3D | Isometric | 1/4 in |
| Decoration and candy placement | Square grid or isometric | 1/4 in |
One set of templates, printed once, suits every house of that size you will ever build. Keep the cards in an envelope with the layout plan folded around them and the whole design survives to next December.
Mistakes That Ruin a Gingerbread House
Mistake: Roof Panels Cut to the Half Span
Problem: The panels are drawn 8 squares wide because the house is 16 squares across. They cover the span but not the slope, and both sides of the roof finish 2 squares short of the eave with a gap running the length of the house.
Solution: Take the panel width off the sloping edge of the gable, which is 10 squares when the half span is 8 and the rise is 6. Add the overhang on top of that, not instead of it.
Mistake: Both Pairs of Walls at Full Length
Problem: All four walls are drawn to the footprint, so the assembled house is one wall thickness too long and too wide in every direction. The roof panels, cut to the drawing, no longer reach the ridge, and the base will not sit on the board you cut for it.
Solution: Pick the pair that runs through, and take two squares off the width of the other pair. Gable walls run through; side walls get trimmed to 22 squares.
Mistake: Mixing Up the Two Scales
Problem: The layout plan, where one square is one inch, gets used as a template. The pieces come out a quarter of the size they should be, and a 6 square side wall is cut as an inch and a half of dough.
Solution: Write the scale in capitals at the top of every sheet before drawing anything on it, and never put a template piece and a layout piece on the same sheet.
Mistake: Baking the Whole Batch Before Checking One Piece
Problem: All six pieces come out of the oven slightly larger than their templates and all slightly different from each other. Nothing is square, the walls lean, and there is no dough left to recut a piece.
Solution: Bake one spare rectangle of a known size with the first tray and measure it against its template. Trim the pieces hot, or redraw the templates by the difference and cut the rest from those.
Conclusion
A gingerbread house is a small construction project, and it fails in the ways construction projects fail: a piece sized to the wrong dimension, four walls that do not account for their own thickness, a cutting list that was never checked against the material. All three are paper problems, and all three are cheap to find on paper.
Print quarter inch squares, draw the pieces at full size, pick a rise and a half span whose slope lands on a grid line, take the roof panel width from that slope, lay the pieces out on a plan of your own tray, and bake one test rectangle before the rest. Then the parts fit, and the only thing left to argue about is the candy.
Print a Template Grid
Quarter inch squares on Letter, the sheet these templates are drawn at full size on. Switch the unit to metric for 5 mm squares. Free, with no account and nothing to install.
Create Your Template GridRelated Resources
- Woodworking and DIY Project Plans: cut lists and cutting diagrams for pieces that have to meet
- Pumpkin Carving Patterns on Graph Paper: the same measure, draw and transfer order on a curved surface
- Isometric Graph Paper: the three-axis sheet for drawing the finished house
- Isometric Drawing on Graph Paper: building a solid from its flat views
- The Grid Method for Drawing: scaling a reference photo onto the template grid
- Room Layout on Graph Paper: choosing a scale and holding to it across a whole plan
- Coordinate Graphing Mystery Pictures: another winter project that runs on a printed grid
- Design Sketching on Graph Paper: working an original design up from a rough idea