Pumpkin Carving Patterns on Graph Paper: Design, Size and Transfer Your Own
Printed pumpkin stencils all share one problem: they were drawn for somebody else's pumpkin. The face is too wide for yours or too small, or it was laid out flat and the eyes end up so far around the sides that nobody standing at the door can see them. Drawing your own pattern on graph paper fixes that. The grid lets you measure the part of the pumpkin that actually faces the street and size the design to it, check that every piece of wall you mean to keep is still attached to something, and scale a small sketch up to full size one square at a time. This article covers measuring the carving face, choosing between square and polar paper, drawing a pattern that survives the knife, getting it onto the skin, and the order to carve in so the delicate work happens while the pumpkin is still strong.
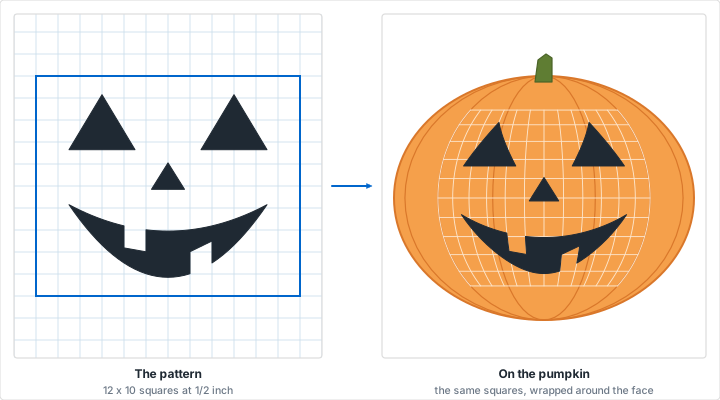
Measure the Carving Face
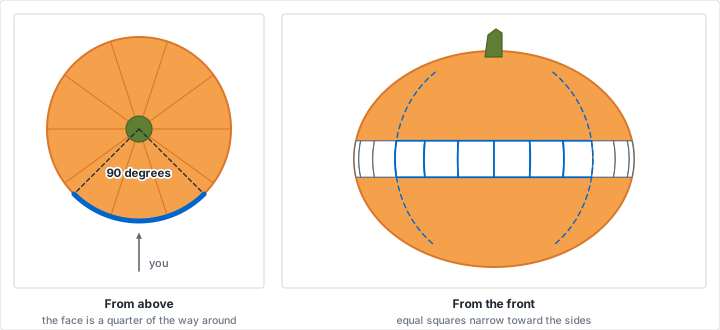
A pumpkin is not a flat surface, and a design only reads from the front if it stays on the front. Wrap a flexible sewing tape around the widest part of the pumpkin to get its circumference. The part a viewer sees clearly is about a quarter of that distance, centered on the side you choose. At the edges of that quarter the skin is turned 45 degrees away from you, and a feature there already looks about 70 percent of its true width. Past it the squeeze gets fast: at 60 degrees a feature looks half as wide, and at 75 degrees it is a sliver.
So the working rule is simple. Divide the circumference by four, and that is the widest your design should be. A pumpkin 32 inches around takes a design about 8 inches wide. One 24 inches around takes about 6. For the height, lay the tape over the front of the pumpkin from the point where the shoulder starts to curve in toward the stem, down to the point where the base starts to curve under. Most carving pumpkins are wider than they are tall, so the usable face often comes out close to square.
Before measuring, roll the pumpkin around and pick its best side: the smoothest, flattest one with the shallowest ribs. Deep ribs make a straight line on the pattern jump in and out as it crosses them, and a face on a lopsided side looks lopsided no matter how carefully it is drawn.
Then convert the measurement into squares, because squares are what you will be drawing in. On half inch paper, an 8 by 7 inch face is 16 squares by 14. On a 1 cm grid, a 20 cm face is 20 squares. Rule a box of that size on the sheet before you draw anything, and keep the whole design inside it.
Choose the Grid
Two kinds of paper cover nearly every pumpkin design. The choice depends on whether the design is built from rows and columns or from a center.
- Square grid for faces, lettering, silhouettes and anything blocky. Half inch squares, or 1 cm squares on metric paper, give enough detail for a face without so many squares that you lose count. Pixel designs are an especially good fit, since every square is either cut or kept: a ghost or a skull drawn the way our article on pixel art on graph paper describes carves exactly as drawn.
- Engineering paper for large or detailed patterns. A heavier line every five squares on engineering graph paper means you count in fives rather than ones, which matters when a pattern is 30 squares across and you are copying it by eye.
- Polar paper for anything radial: a sunburst, a spider web, a flower, a clock face. Rings and spokes on polar graph paper give you equal angles for free, which is the part of a radial design that is hardest to judge by eye. The section on radial designs below covers the settings.
Draw the Pattern
Work in pencil first and commit in marker later. A carving pattern is mostly decisions about what to remove, and those change several times on the way to a design that works.
Three Tones: Cut, Shaved and Left
A lit pumpkin has three levels of brightness, and the pattern should use one fill for each. Black is cut through: the brightest parts, where the light comes straight out. A lighter shade or hatching is shaved: the skin and a thin layer of flesh scraped away without piercing the wall, so the light glows through softly. White is left alone: the untouched skin, which stays dark. Many classic jack-o'-lanterns use only the first and third, but shaving is what lets a pattern carry fine lines and shading that could never be cut out.
Scaling a Sketch Up
The easiest way to design is small. Sketch the idea in a notebook on quarter inch squares, where a whole face fits in a few inches and is quick to redraw. Once it looks right, print a sheet with the same number of squares at the finished size and copy it across square by square. Quarter inch to half inch doubles every dimension; quarter inch to one inch quadruples it. That is the grid method, and our guide to the grid method for drawing covers the technique in detail, including how to handle a reference photo. It works just as well for a pet's silhouette or a team logo as it does for a face.
The same thumbnail first, full size second approach runs through our article on a month of daily ink drawings, and the reasoning is the same here: small drawings are cheap to throw away, and a carved pumpkin is not.
Bridges: Every Piece Must Hold On
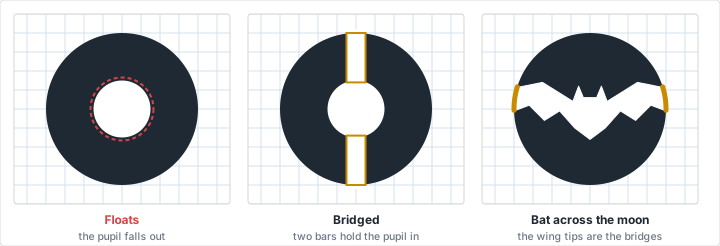
This is the rule that separates a pattern that carves from one that collapses. Every piece of wall you want to keep has to connect to the uncut pumpkin around the design. If a white area on the pattern is completely surrounded by black, it has nothing holding it, and it falls out the moment the last cut around it is finished.
Checking is easy on paper and nearly impossible once you are carving. Put a pencil point on each white area and trace a path to the edge of the pattern without crossing any black. If there is no such path, the piece floats. The usual offenders are the pupil in a round eye, a figure inside a moon, and the enclosed centers of letters and numbers: O, A, B, D, P, Q and R, and 0, 4, 6, 8 and 9. If a word is part of the design, the letter spacing advice in our article on hand lettering on graph paper helps, but the counters still need bridges, which is exactly why stencil lettering has those small gaps in it.
There are three ways to fix a floating piece:
- Add a bridge. A bar of uncut wall from the piece to the outside, like the two bars that hold a pupil in place. Stencil lettering does the same thing to an O.
- Touch an edge. Redraw the piece so it reaches the edge of the cut, the way a bat's wing tips can run out to the rim of the moon behind it. The design stays the same and the bridge is hidden in it.
- Shave instead of cut. A piece surrounded by shaving is still attached through the wall behind the shaved area, so nothing falls out.
The grid also settles how wide a bridge has to be. Pumpkin flesh is soft, and a bridge narrower than a quarter inch tends to snap while you carve around it or sag a day later. On half inch paper, make every bridge at least half a square wide, and a full square wherever you can. The same goes for the wall between two neighboring cuts, such as the space between two teeth. If a pumpkin is going to sit out for several days, err wider, because the flesh softens as it dries.
Radial Designs on Polar Paper
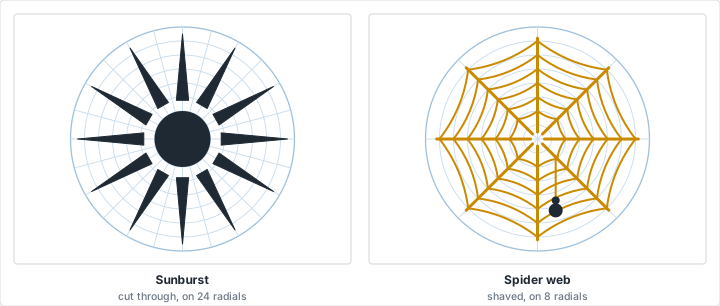
A sunburst with twelve rays is easy to imagine and hard to draw freehand, because unequal rays are the first thing anyone notices. On polar paper the angles are done for you. In the generator, choose the polar style, set the grid size to half an inch (this is the spacing between rings), and pick the number of radials to match the design:
- 24 radials (15 degrees apart) for a twelve-ray sunburst. Center a ray on every other line and the lines between them mark the gaps.
- 12 radials for a clock face or a twelve-petal flower.
- 8 radials for a spider web. Real webs have more spokes, but eight reads clearly at pumpkin scale.
The generator centers the polar grid on the page, so its center is easy to find. Tape the sheet so that center sits in the middle of the carving face, and poke it first when transferring, since every other line on the pattern is measured from it.
Radial designs need one extra decision: what to cut and what to shave. A sunburst cuts cleanly because every ray has wall on both sides of it and a ring of wall between the rays and the center disc. A spider web does not. Cut out the spaces between its threads and there is nothing left but threads, which will not hold. Shave the threads instead and the web glows while the wall stays whole, with only the spider's body cut through. The same paper suits any design built around a center, including the mandala patterns that turn up in a month of daily drawing prompts.
One caution specific to pumpkins: a radial design is round on paper but not on the pumpkin. The outer rings wrap around the curve, so a sunburst sized to the full front quarter will look slightly oval from the front, with its side rays shorter than its top and bottom ones. Either keep the outer ring well inside the quarter, or accept the effect, which most people read as the pumpkin's shape rather than an error.
Transfer the Pattern to the Pumpkin
Print at 100 percent with page scaling turned off, so the squares measure what you asked for. The printing tips guide covers the settings for each common browser. Ordinary copy paper is better than card stock here, because it has to bend around the pumpkin.
Tape, Darts and Pinholes
Trim the pattern to leave a margin of a square or two around the design. A flat sheet cannot lie on a curved surface without wrinkling, so cut short slits from the edge of the margin in toward the design every two or three inches. These are darts, the same trick a dressmaker uses to fit flat fabric to a curve. With them cut, the paper can overlap itself at each slit and lie flat against the skin. Tape across every dart and around the edges.
Now poke along every line of the design with a pushpin, an awl or the poking tool from a carving kit, just deep enough to break the skin. Space the holes about an eighth of an inch apart, which is a quarter of a half inch square, and closer on tight curves. Before peeling the paper off, lift one corner and check that you have not missed a line. Once the paper is removed, rub a little flour over the holes to make them stand out, then join the dots with a dry-erase marker. The marker lines wipe off with a damp paper towel when carving is finished.
Or Rule the Grid on the Pumpkin
For a large freehand design, skip the pinholes and use the grid method directly on the skin. Mark the center of the carving face, then use the flexible tape to tick off equal steps horizontally and vertically along the surface. Join the ticks with a dry-erase marker to make a grid that follows the curve, with the same number of squares as your pattern, and copy the design into it square by square. One inch squares on the pumpkin from a quarter inch pattern gives a four times enlargement, which suits a large pumpkin well.
Carve in the Right Order
- Open the pumpkin. Cut the lid with the blade angled in toward the center, so the lid is a cone that rests on its own ledge instead of dropping inside. Cut a small notch in the rim so it goes back on the same way. Or leave the top whole and cut the opening in the back or the base. An opening in the base lets you set the pumpkin down over its light.
- Scrape the inside wall behind the design to about an inch thick. A thinner wall is easier to saw through, and shaved areas glow brighter over a thin wall than over a thick one.
- Cut the smallest, most central pieces first, and work outward to the largest. Every opening weakens the wall around it, so the fine work belongs at the start while the pumpkin is still at full strength. Push each cut piece out from the inside rather than pulling it.
- Saw, do not slice. Hold the saw like a pencil, straight into the skin, and use short gentle strokes. Turn the pumpkin rather than twisting the blade around a corner.
- Shave last. Scrape the shaved areas with a clay loop tool, a lino cutter or the edge of a spoon, and test with a light inside as you go. Stop when the glow is where you want it. You can always take more off.
A carved pumpkin starts to soften and shrink within a few days, faster in warm weather, so carve close to when you want it on display. A battery candle is the safest light. If you use a real flame, cut a small chimney hole in the lid above it.
Choosing Your Settings
| What you are carving | Paper | Square or ring size |
|---|---|---|
| A classic face | Square grid | 1/2 in, or 1 cm |
| A word or a house number | Square grid | 1/4 in for detail, bridges at least one square |
| A silhouette from a photo | Square grid, grid method | 1/4 in sketch, 1/2 in or 1 in at full size |
| A large, detailed pattern | Engineering, heavy every 5 | 1/4 in |
| A sunburst or a flower | Polar, 24 radials | 1/2 in rings |
| A clock face | Polar, 12 radials | 1/2 in rings |
| A spider web | Polar, 8 radials | 1/2 in rings |
A Letter or A4 sheet holds a pattern about 7.5 by 10 inches inside normal printer margins, which covers most pumpkins. For a giant one, switch the paper size to Tabloid or A3 in the generator, or print two sheets and tape them together along a grid line so the squares carry across the join.
Mistakes That Ruin a Pumpkin
Mistake: A Pattern Sized to the Paper, Not the Pumpkin
Problem: The design fills the whole sheet, so on a medium pumpkin it wraps halfway around. From the front, the eyes are squeezed into slivers at the sides and the grin looks like it is sliding off.
Solution: Measure the circumference first, divide by four, and rule a box that size on the sheet before drawing anything.
Mistake: Floating Pieces
Problem: The pupils, the middle of the O in BOO, or the cat inside the moon has no connection to the rest of the wall. It drops out on the last cut and cannot be put back convincingly.
Solution: Trace a path from every white area to the edge of the pattern before transferring. Anything without a path gets a bridge, touches an edge, or is shaved instead of cut.
Mistake: Carving the Big Pieces First
Problem: The mouth is cut out first because it is the fun part, and by the time you reach the teeth, the wall around them flexes under the saw and a tooth breaks off.
Solution: Small and central first, large and outer last. Leave the biggest opening until the very end.
Mistake: Lines Too Thin to Cut
Problem: A whisker, an eyebrow or a web thread is drawn as a narrow cut. At less than a quarter inch wide the wall on either side crumbles, and the line turns into a ragged gash.
Solution: Anything thinner than half a square on half inch paper should be shaved rather than cut. It will glow as a fine line and leave the wall intact.
Conclusion
Graph paper does for a pumpkin what it does for any other project: it turns guesswork into counting. The circumference tells you how wide the design can be, the squares tell you where each feature goes and whether each bridge is thick enough, and the same squares carry the drawing from paper to skin without it drifting.
Measure the pumpkin, rule the box, sketch small and scale up, check every white area for a path to the edge, and carve from the center out. The pattern takes an evening. The pumpkin will look like you meant it.
Print a Pattern Grid
Half inch squares on Letter for a face, or polar paper with 24 radials for a sunburst. Free, with no account and nothing to install.
Create Your Pattern GridRelated Resources
- The Grid Method for Drawing: scaling a sketch or a photo up square by square
- Polar Graph Paper: ring spacing and radial options for sunbursts and webs
- Engineering Graph Paper: heavier lines to count a large pattern by fives
- Creating Pixel Art on Graph Paper: blocky designs where every square is cut or kept
- Calligraphy and Hand Lettering on Graph Paper: spacing a word before it gets carved
- October, A Month of Ink: more October drawing, planned on a printed grid
- Design Sketching on Graph Paper: working out an original design on the grid