The Grid Method: How to Enlarge, Reduce, or Copy Any Drawing Accurately
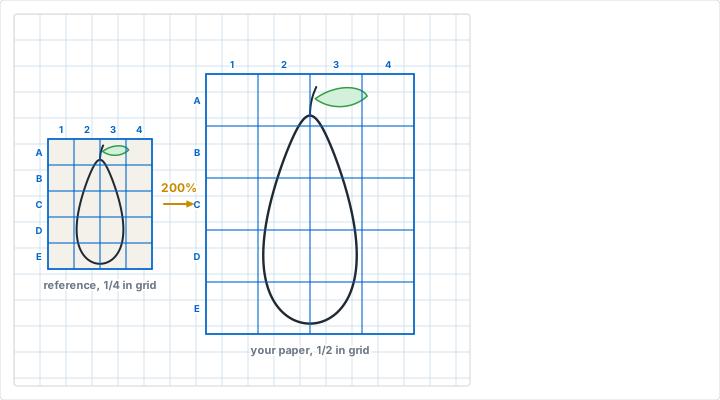
The grid method is the oldest reliable way to copy an image at a different size. You rule a grid over your reference, rule a matching grid on your paper, and then draw one square at a time. It works because it replaces a hard problem -- judging a whole shape by eye -- with a series of easy ones. Nobody can accurately eyeball the curve of a jawline across a whole page. Everybody can see where a line enters and leaves a single small square. Artists have used it since at least the fifteenth century, and it still beats tracing paper and projectors for one simple reason: you are drawing the whole time, so your eye improves while you work.
Why the Grid Method Still Works
Drawing accurately is mostly a measuring problem. When you look at a reference and then at your paper, you are trying to hold a set of proportions in your head long enough to commit them to the page. Distances, angles, and relative sizes all drift in the few seconds it takes to move your eyes. The result is the familiar experience of a drawing that looks fine until you step back and realize the head is too big or the whole thing leans.
A grid removes the need to hold anything in your head. Each square is a small, closed question: where does the line cross the top edge, and where does it leave the bottom? Those are questions you can answer by looking, not by remembering. The grid also gives you a way to check yourself. If square C3 looks wrong, you compare one square with one square, rather than trying to work out where in the whole drawing the error crept in.
Tracing gives you an accurate outline but teaches you nothing, because your hand is following a line that is already there. A projector does the same and needs a dark room. The grid method is slower than both, and that is precisely the point: you are making every judgement yourself, just in small enough pieces that you can get them right.
An Old Technique
Grid transfer appears in Alberti's On Painting in 1435, and Dürer's woodcuts from the 1520s show artists using a gridded frame to draw a sitter in correct proportion. Renaissance workshops used it to scale small studies up to wall-sized cartoons. The technique has not changed since; only the paper has got cheaper.
What You Need
- A reference image. A printed photo, a page from a book, or a sketch of your own. If you do not want to draw on it, slip it into a clear plastic sleeve and rule the grid on the sleeve with a fine marker.
- Graph paper, or a ruler and a sharp pencil. Printed graph paper saves you ruling a grid by hand, and the squares are guaranteed accurate, which hand-ruling rarely is.
- A hard pencil for the grid, a softer one for the drawing. A 2H rules a light grid that will not smudge and erases cleanly. A 2B draws the subject with enough contrast to see against it.
- An eraser you trust. A kneaded eraser lifts grid lines without abrading the paper surface.
Choosing Your Grid Size
The number of squares controls accuracy; the size of the squares controls the output size. These are two separate decisions and confusing them is the commonest early mistake.
For the number of squares, the rule of thumb is that a square should be small enough that no more than one or two lines pass through it. If a square contains an eye, a nostril, and half a mouth, it is too big and you are back to eyeballing. If your squares are so small you have hundreds of them, you will lose your place and the grid will take longer to rule than the drawing takes to make.
Squares by Subject
- Simple silhouettes and lettering: 4x5 or 5x7 squares. There is little internal detail to place.
- Still life, animals, landscapes: 8x10 to 10x12. Enough to pin down curves without becoming fiddly.
- Portraits: 12x16 or finer. Faces are unforgiving; a two-millimeter error in eye position is visible, and the extra squares are worth the ruling time.
- Highly detailed reference: Rule a normal grid overall, then subdivide only the squares containing the difficult areas. There is no rule that says every square must be the same size.
Subdivide Instead of Starting Over
If one area is fighting you, draw a single diagonal or a cross through that square on both the reference and the drawing. You have just quartered the problem without re-ruling anything. This is far faster than restarting with a finer grid across the whole image, and it concentrates the effort where the difficulty actually is.
Setting Up the Two Grids
Both grids must have the same number of columns and the same number of rows. That is the only rule that cannot be broken. The squares themselves can be any size, as long as they are square.
Label them before you draw anything. Number the columns along the top and letter the rows down the side, on both the reference and your paper. This takes thirty seconds and eliminates the single most demoralizing error in the whole method, which is realizing two hours in that you have been working one row out.
Rule the grid on your drawing paper lightly. You will be erasing it later, and a heavily indented line survives erasure as a groove that catches every subsequent pencil stroke. If you are working on paper you cannot erase cleanly, such as watercolor paper, rule the grid on a separate sheet and use a light box, or accept that faint grid lines will remain in the finished piece.
Keep the Aspect Ratio
If your reference area is 4 squares wide by 5 tall, your drawing area must also be 4 by 5. Not 4 by 6, and not 4 wide by 5 tall in cells that are wider than they are high. Any mismatch stretches the drawing in one direction, and because the distortion is even across the whole image it is surprisingly hard to spot until the piece is finished and something about it looks subtly wrong.
Making the Transfer, Square by Square
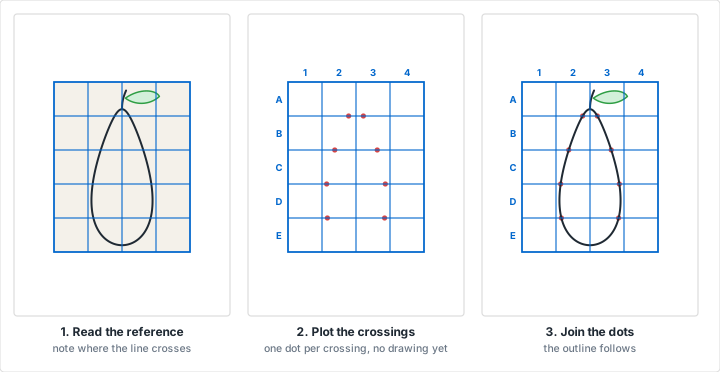
Here is the shift in thinking that makes the method work: you are not copying a shape, you are plotting where a line crosses a grid line. Those crossings are objective facts you can read off the reference. Once they are marked, the drawing largely constructs itself.
Step 1: Mark the Crossings
Work along one grid line at a time and mark, with a light dot, every point where the subject's outline crosses it. Do not draw any part of the subject yet. Read the position as a fraction of the cell -- "a third of the way along the top of C2" -- and put a dot at the same fraction on your paper. Fractions transfer between grids of any size; measurements in millimeters do not.
Step 2: Join the Dots
Now join consecutive dots, working one square at a time and looking at the reference square as you go. Within a single square, a line is almost always either straight or a simple arc, and you can see immediately which. This is where the accuracy comes from: you are drawing a two-centimeter segment with both endpoints already fixed.
Step 3: Work Light, Then Commit
Keep everything faint until the whole outline is in place. Errors are much easier to see once the drawing is complete, because you can compare the overall shape rather than one square. When it looks right, go over the lines with more pressure or in ink, and only then erase the grid.
Work Outside In
Do the outline of the whole subject before any internal detail, and do the largest shapes before the small ones. If the silhouette is wrong, no amount of careful detail will rescue the drawing, and you would rather find that out after twenty minutes than after two hours. It also means that if you run out of time you have a complete, correct outline rather than one beautifully finished eye.
Working at Other Scales
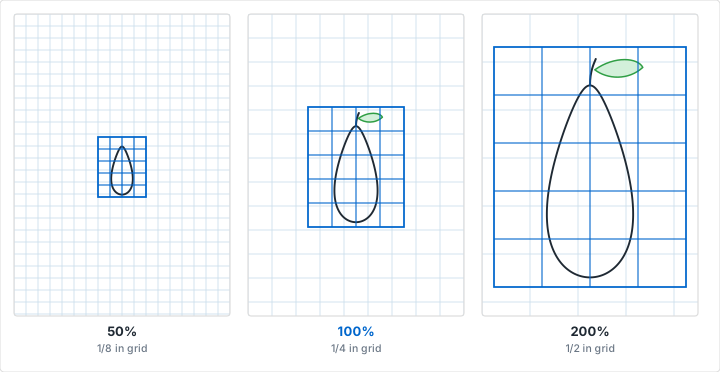
The output size is set entirely by the ratio between the two grid spacings. Nothing else about the method changes.
- Enlarging: Use a coarser grid on your paper. A 1/4 inch reference grid copied onto a 1/2 inch grid gives you 200%. Onto a 1 inch grid, 400%.
- Same size: Use identical spacings. Useful when you want an accurate copy you can then alter, or when you are transferring your own sketch onto better paper.
- Reducing: Use a finer grid on your paper. A 1/4 inch reference onto a 1/8 inch grid gives 50%. Reducing is harder than enlarging, because the detail has to be simplified rather than merely relocated, and you must decide what to leave out.
To hit a specific finished size, work backwards. If you want a drawing 12 inches wide and your reference divides comfortably into 8 columns, each square on your paper needs to be 12 divided by 8, or 1.5 inches. Set your grid spacing to that and the finished drawing will land at exactly the size you planned. Our guide to choosing a grid size covers the arithmetic in more detail, and the generator will produce any spacing you need.
Worked Example
You have a 6 x 4 inch photograph and want a 15 x 10 inch drawing. That is 250%. Rule the photo into 12 columns and 8 rows, which gives half-inch squares. Your paper needs the same 12 by 8, at 15 divided by 12 = 1.25 inches per square. Check the other axis: 8 rows at 1.25 inches is 10 inches. It matches, which confirms the aspect ratio is preserved.
Changing the Shape of the Frame
Occasionally you genuinely want to change proportions -- fitting a landscape into a square frame, for example. The grid method handles this, but you must do it deliberately rather than by accident.
The honest approach is to crop rather than stretch. Decide which columns or rows to leave out, mark them on the reference, and draw only what remains. The subject keeps its proportions and you have simply chosen a different view of it. Stretching, by contrast, changes every proportion in the image at once, and faces in particular become uncanny very quickly.
Beyond Copying
The same setup solves several problems that are not obviously about copying at all.
- Murals and large work. This is the classic use. A small study is gridded into a few dozen squares and the wall is gridded to match with chalk lines, letting one person scale a sketch up to several meters without losing the proportions.
- Checking your own freehand drawing. Draw freehand first, then lay a grid over both your drawing and the reference. The squares show you exactly where you drifted, which is far more useful feedback than a general sense that something is off.
- Transferring a design onto an awkward surface. Wood, fabric, a pumpkin, a cake. Anything you can rule a grid on, you can transfer a design onto.
- Consistent repeated characters. Comic and animation artists grid a model sheet so the same character can be redrawn at the same proportions across many panels.
- Learning to see. Used as an exercise rather than a production tool, gridding trains you to notice relative position and negative space. Many people find their freehand accuracy improves after a few gridded studies, and then stop needing the grid.
Common Mistakes
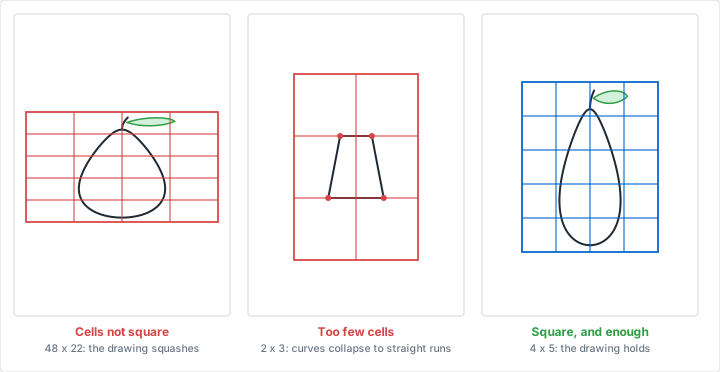
Mistake: Cells That Are Not Square
Problem: The grid has the right number of columns and rows, but the cells are wider than they are tall. Every proportion in the drawing is stretched by the same factor, so nothing looks obviously wrong in any single square, and the error is invisible until the piece is finished.
Solution: Use printed graph paper rather than ruling by hand, and check before you start by measuring the diagonal of a cell in both directions. If you must rule by hand, mark both axes with the same ruler and the same spacing, and verify one cell with a set square.
Mistake: Too Few Squares
Problem: With only a handful of large cells, each one contains too much information. You know where the outline enters and leaves, but everything between those points is guesswork, and curves flatten into straight runs.
Solution: Add squares until no cell contains more than one or two lines. If only part of the image is troublesome, subdivide those cells rather than re-ruling the whole grid.
Mistake: Drawing the Subject Instead of the Squares
Problem: Halfway through, you stop consulting the grid and start drawing what you think the subject looks like. Accuracy collapses at exactly that point, and the transition is usually visible in the finished work.
Solution: If you catch yourself doing this, it is often a sign the drawing is going well and you no longer need the grid. Finish the piece freehand deliberately, rather than drifting between two methods without noticing.
Mistake: Pressing Too Hard on the Grid
Problem: The grid erases but leaves grooves in the paper, and every later pencil stroke catches in them. On smooth paper the indentation can be more visible than the original line was.
Solution: Rule the grid with a hard pencil and almost no pressure -- it only needs to be visible to you, at arm's length, in good light. Better still, print the grid so there is nothing to erase at all.
Mistake: Unlabeled Grids
Problem: Without row letters and column numbers, it is easy to work one row out, and the error is often discovered only when the drawing fails to close up at the far side.
Solution: Number and letter both grids before you start, and mark which way is up on the reference. Thirty seconds of labeling prevents the single most frustrating failure the method has.
Practice Exercises
Exercise 1: Same Size, Simple Subject
Take a simple high-contrast image -- a leaf, a hand tool, a bottle -- and copy it at 100% on a 6x8 grid. The aim is not a beautiful drawing but an accurate one. When you have finished, lay the two side by side and mark every square that is noticeably wrong. Those squares tell you which shapes your eye finds hardest.
Exercise 2: Double the Size
Repeat with the same reference at 200%. You will find enlarging feels different: the lines within each square are longer, so wobble in your hand shows more, and you have to draw more slowly and deliberately.
Exercise 3: A Portrait at Two Densities
Copy the same face twice, once on an 8x10 grid and once on a 16x20. Comparing the two is the clearest demonstration of what grid density buys you, and it will tell you where your own threshold sits for the kind of work you want to do.
Exercise 4: Grid Your Own Freehand Attempt
Draw something freehand, without any grid, then grid both your drawing and the reference afterwards. This is uncomfortable and unusually instructive. The pattern of errors is often consistent -- many people systematically enlarge faces, or compress the lower half of a composition -- and once you know your own bias you can correct for it.
Conclusion
The grid method is not a shortcut and it is not cheating. It is a way of breaking an impossible judgement into a few dozen easy ones, and it is as useful to a beginner copying a photograph as it is to a muralist scaling a study onto a wall. Keep the cells square, use enough of them, label both grids, and work outside in. The drawing takes care of itself after that.
Print the grid rather than ruling it and you remove the two commonest sources of error -- cells that are not quite square, and grooves left behind after erasing -- before you have drawn a single line.
Ready to Try the Grid Method?
Generate matching grids at any two spacings -- one for your reference, one for your paper -- and print them at exactly 100%.
Create Graph Paper NowRelated Resources
- How to Choose the Right Grid Size -- working out the spacing that gives your finished size
- Professional Printing Tips -- printing at 100% so your squares are the size you asked for
- Design Sketching on Graph Paper -- using the grid for original work rather than transfer
- Creating Pixel Art on Graph Paper -- another square-by-square discipline
- Designing Quilt Blocks on Graph Paper -- scaling a block to a finished size
- Dot Grid Paper -- a lighter guide when you want the grid to disappear
- Digital Graph Paper for Tablet Apps -- the grid as a layer you hide when the drawing is done
- Graph Paper Use Cases