The Hexagon Habit Tracker: One Printed Sheet for a Whole Month
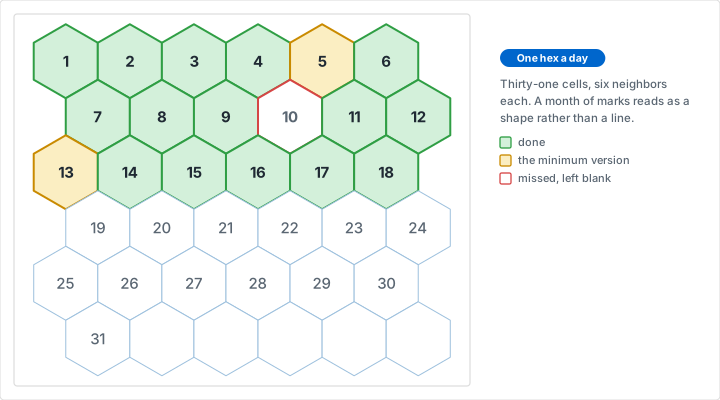
Most habit trackers are a row of boxes with a number under each one, and they work well enough until the month goes badly. Then the row turns into a line of ticks with holes punched through it, and the usual response is to stop looking at it. A hexagon tracker is the same idea on a different tiling: one cell per day, numbered 1 to 31, laid out so that every cell touches six others instead of two. Days you complete grow outward as a filled shape rather than marching along a line, and a missed day shows up as a hole in that shape, which is much harder to overlook and much easier to close. The generator prints the sheet with the numbers already in the cells, so there is nothing to rule and nothing to letter by hand. This article covers how to set the range and the cell size, what to write in a cell, how to handle the days you miss, how to fit two or three habits on one sheet without it turning into a puzzle, and the layouts for runs that are longer or shorter than a month.
Why a Hexagon Instead of a Row of Boxes
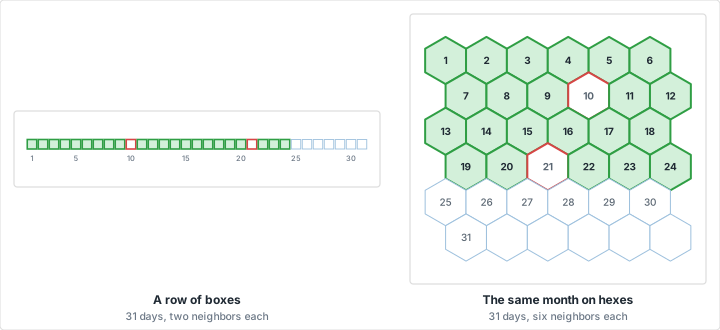
A row of 31 boxes is a list. Each box touches the day before it and the day after it, so a good run reads as a line and a bad week reads as a gap somewhere along that line, in a place you have to count to identify. The information is all there. It is just laid out in the one dimension that makes a month hardest to see at a glance.
A hexagonal tiling gives each day six neighbors and no gaps between cells, so the filled days accumulate as an area. Two weeks of consistency is a solid patch of color rather than a long thin stripe, and a single missed day inside that patch is a white cell surrounded by filled ones. That contrast is the whole point. It does not make the habit happen, and no layout does, but it makes the state of the month legible in the second or two you actually spend looking at the sheet.
There is a practical reason as well. A hexagon has a nearly round interior, so a printed number sits comfortably in the middle with room beside it for a mark, where a square of the same area pushes both into the corners. Hexagons also tile more densely than squares of equivalent writing room, which is why hexagonal graph paper fits a readable month onto the top half of a sheet and leaves the rest for a key and notes.
Print the Sheet
Three settings turn the generator into a tracker. Choose the hexagonal grid style, turn cell numbering on, and set the range to 1 through 31. Everything else is preference: paper size, line color, and how big the cells are. The controls themselves are documented in detail on the hexagonal graph paper page, so what follows is only what matters for a tracker.
Setting the Range
Two fields define the run. Numbers From is the first value and Numbers To is the last. For a calendar month that is 1 and 31, or 1 and 30, or 1 and 28 in most Februaries. Cells past the last number print blank rather than disappearing, which is deliberate and useful: the blank cells below the month are where the key goes, and where you write the rule for what counts as a completed day.
Leaving Numbers To empty numbers every cell on the page instead, which is what you want for a long run rather than a month. Numbers From matters more than it looks: set it to 32 and the second sheet of a two month project continues the count instead of starting over.
Choosing a Cell Size
With the hexagonal style selected, the size field is a hex radius, not a cell width. A hexagon is its radius times the square root of three across the flats and twice its radius from point to point, so a 15 mm radius draws a cell roughly 26 mm wide and 30 mm tall. That is the comfortable size for a tracker: the printed number stays small and legible, and there is room beside it for a mark without either one touching an edge.
Smaller works, to a point. The numbers scale with the cell, so below about a 6 mm radius they print as smudges on an inkjet and crowd whatever you meant to put in the cell. Larger is the right move if you plan to put more than one habit in a single cell, where a 20 mm radius gives each mark its own corner. In inches, 0.6 is the equivalent of the 15 mm default and 0.8 is the roomy version.
Paper That Survives a Month
A tracker is handled every day for four or five weeks, which is more wear than most printed grids ever see. Ordinary 20 lb copy paper softens at the folds and creases where it is pinned or taped, and highlighter soaks straight through it into whatever is underneath. A 60 lb stock feeds through a home printer without the jams that full card stock can cause and holds up to a month of daily marking, including wet highlighter.
Fill Rules That Survive a Bad Week
Decide what counts before day one and write it in a blank cell under the month. The rule should be short enough to fit there. Twenty minutes of practice, one walk, one page written, no drink today. A rule you have to interpret each evening is a rule you will eventually argue with, and the argument is usually how a tracker quietly ends.
Give every day exactly one mark. Fill the cell with a highlighter or a colored pencil, leaving the printed number visible through it, and stop there. Trackers that ask for a rating out of five, a duration and a note collect all three for about a week and then collect nothing.
Write a minimum version of the habit next to the main rule. One paragraph instead of one page, five minutes instead of thirty, a walk to the end of the street. A day that goes entirely wrong can still produce the minimum, and a cell filled on the strength of the minimum keeps the shape growing. That is not lowering the bar. It is the difference between a month with a hole in it and a month you abandon on the twelfth.
When you do miss a day, leave the cell blank and carry on. Backfilling from memory turns the record into fiction, and once a week is filled in from memory the next gap gets the same treatment. A blank cell in the middle of a filled patch is information, and it is the most useful thing on the sheet: it is the one that makes you look at what happened that day.
One honest limit is worth naming. The sheet records marks, not behavior. A day you did the thing and forgot to fill the cell looks identical to a day you skipped, so pick a fixed moment to mark it, at the same point in the evening or the next morning, and keep the sheet where that moment happens.
Tracking More Than One Habit
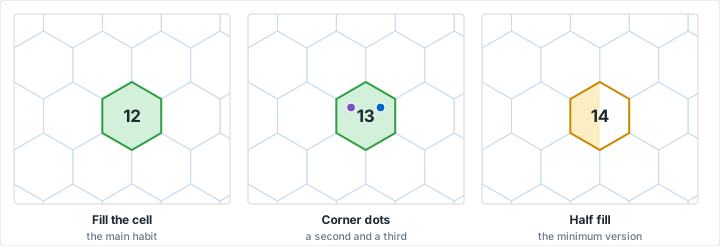
Two or three habits fit in the same month if each one has its own mark and the marks cannot be confused. There are three conventions worth knowing, and they can be mixed.
- Fill the cell for the main habit, in one color. It is the mark that reads from across the room, so it belongs to the habit that matters most.
- A corner dot or a small symbol for the second habit, always in the same corner. A dot in the upper left for the vitamin, upper right for the walk. Because the cell is a hexagon, the corners are far enough apart to stay distinct at a 15 mm radius.
- A diagonal half fill for a habit that is partial by nature, such as a target you sometimes half meet. Half the cell in the same color says the day counted for something without claiming it was complete.
Past three habits, stop packing them in. A cell with five different marks takes longer to read than a list would, and the key ends up longer than the month. Print one sheet per habit at a smaller radius instead and put them side by side, which keeps each month legible as its own shape. Whichever you choose, draw the key into the blank cells under the numbered run, where it prints as part of the sheet rather than floating in a margin.
Layouts Beyond the Month
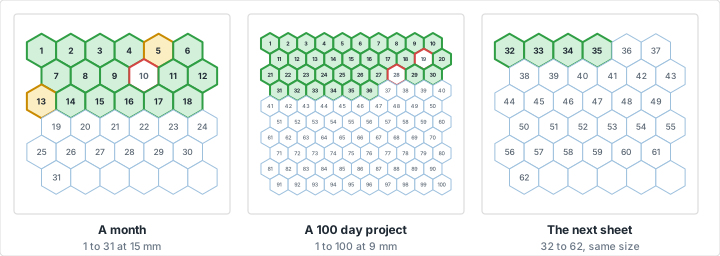
A month is the obvious use, but the range fields make the same sheet work for anything counted in a fixed run.
- A 30 day challenge. Set the range to 1 through 30 and start on whatever date you like. The sheet is the challenge, not the calendar, so day 1 is the day you begin.
- A 100 day project. Drop the radius to 8 or 10 mm and number 1 through 100. The cells are too small for notes and exactly right for a fill, and a hundred of them on one page is a genuinely motivating object to look at in week three. A month of daily drawings works the same way, which pairs neatly with a daily ink drawing challenge: number the hexes to the prompt list and fill each one as its drawing is finished.
- A run continued across sheets. Numbers From 32 on the second sheet, 63 on the third. The count carries on and the sheets can be pinned up as a strip.
- Things that are not days. Chapters read, lessons taught, swatches knitted, rows of a long cross stitch or knitting project, boxes unpacked after a move. Anything with a known total and a satisfying end is a candidate.
Hexagons have a quiet history in exactly this kind of counting. English paper piecing builds a quilt top out of hundreds of fabric hexagons stitched one at a time over paper templates, and quilters have tracked those pieces on hex paper for a very long time, which our article on quilt block design on graph paper gets into. The tracker is the same instinct applied to days.
Putting It in a Journal
A printed tracker does not have to stay a loose sheet. Trim close to the numbered block and glue or tape it into a notebook as a monthly spread, which gives you the printed numbering without hand ruling 31 hexagons. If you keep a journal already, the spread conventions in our bullet journaling tutorial cover where a tracker usually sits in a monthly setup and what tends to go beside it.
Two variations are worth knowing. Print on A5 rather than A4 and the sheet drops straight into an A5 notebook with no trimming at all. Or keep the whole thing on a tablet: export the sheet as an image, import it as a page template in a note-taking app, and fill the cells with a stylus, which our guide to digital graph paper for tablet apps walks through. If you would rather draw the tracker freehand and keep the page flexible, dot grid paper gives you guides without printing a fixed layout, at the cost of ruling the hexagons yourself.
Choosing Your Settings
| What you are tracking | Range | Hex radius |
|---|---|---|
| A calendar month | 1 to 31, or 30, or 28 | 15 mm, or 0.6 in |
| A 30 day challenge | 1 to 30 | 15 mm, or 0.6 in |
| Two or three habits per day | 1 to 31 | 20 mm, or 0.8 in |
| A 100 day project | 1 to 100 | 8 to 10 mm |
| A spread pasted into an A5 journal | 1 to 31 | 10 mm, on A5 paper |
| A second sheet continuing the first | 32 to 62 | Same as the first sheet |
Print at 100 percent with page scaling turned off. It matters less here than on a scale drawing, but scaling shrinks the printed numbers along with the cells, and the numbers are the reason this sheet exists.
Mistakes That Waste a Month
Mistake: A Radius Too Small for the Numbers
Problem: The whole month is squeezed into a corner of the page at a 5 mm radius. The numbers print as gray smudges, and a filled cell covers the number completely, so by the tenth you are counting cells to work out which day you are on.
Solution: Use a 15 mm radius for a month, and treat 6 mm as the floor for any sheet with numbering on. Print one test page before committing to a month of it.
Mistake: Highlighter on Copy Paper
Problem: The ink bleeds through to whatever is behind the sheet and spreads along the paper fibers past the cell edge, so the filled shape loses the crisp boundary that made it readable.
Solution: Print trackers on 60 lb stock, or fill with colored pencil instead, which stays exactly where it is put and never bleeds.
Mistake: Backfilling a Missed Week
Problem: Seven blank cells look like failure, so they get filled in from memory on a Sunday evening. The month now shows a habit you did not have, and the next gap gets the same treatment because the first one did.
Solution: Leave the blanks. A hole in a filled patch is the most informative mark on the sheet, and it is the one that prompts the question worth asking.
Mistake: Eight Habits on One Sheet
Problem: Each cell needs eight tiny marks in fixed positions, the key takes up more space than the month, and marking a day becomes a two minute chore. By the second week nothing is being marked at all.
Solution: Three marks per cell is the practical ceiling. Beyond that, print a separate sheet per habit at a smaller radius and lay them side by side.
Conclusion
A habit tracker earns its place by being read, not by being elaborate, and the hexagon layout is a small change that makes a month easier to read. Days accumulate as a shape, a gap is visible instead of countable, and the printed numbering means the only work left is filling one cell a day.
Set the range, pick a radius that leaves room beside the number, write the rule in a blank cell, and start on whatever day you are on. The sheet is disposable and the month is not, which is the right way round.
Print a Numbered Hex Tracker
Hexagonal style, cell numbering on, range 1 to 31, at a size that leaves room to write. Free, with no account and nothing to install.
Create Your TrackerRelated Resources
- Hexagonal Graph Paper: the numbering controls, cell sizing and hex coordinates in full
- Bullet Journaling on Graph Paper: where a tracker sits in a monthly spread
- Dot Grid Paper: guides without a fixed printed layout, for drawing a tracker by hand
- Digital Graph Paper for Tablet Apps: the same sheet as a note-taking app template
- Graph Paper for a Daily Ink Challenge: a numbered month applied to daily drawings
- Quilt Design on Graph Paper: hexagons counted one piece at a time
- Screen-Free Projects on Graph Paper: more reasons to keep a sheet of paper around