Closet, Pantry and Shelf Plans on Graph Paper: Fitting Storage to the Space You Have
To plan a closet or a pantry on graph paper, draw the wall head on rather than from above, and let one square stand for two inches. Print 0.2 inch squares on Letter and the sheet is 37 squares across by 50 down, which is 74 inches of wall by 100 inches of height: enough for a six foot opening under an eight foot ceiling with a square to spare. Every number the job needs then becomes a count. A 12 inch shelf is six squares deep, a 16 inch gap between shelves is eight squares tall, and the three quarter inch board under each shelf is the one dimension too small to draw at that scale, which is exactly why it is the one people forget. This article measures the opening, converts it, places the shelves and the rod, checks the depth and the door, and ends with a cut list you can take to the store.
Why Draw the Wall and Not the Floor?
A floor plan is the right drawing for furniture and the wrong one for storage. Our room layout tutorial puts a bed, a desk and a dresser into a room by their footprints, because a footprint is what decides whether they fit. A closet is the opposite problem. Its footprint is fixed, often a rectangle 24 inches deep that you cannot change, and every decision left to make runs up the wall: how many shelves, how far apart, how high the rod, what still has to be reachable from the floor.
So the drawing you want is an elevation, which is the wall seen straight on, with height up the page and width across it. The room layout tutorial names this in passing as the fix for furniture you cannot visualize; this article is that drawing taken seriously. It is the same view a woodworker calls the front view, and the way it is built is the same, so our post on woodworking and project plans is worth having open beside this one for the parts about views, dimensioning and lumber sizes.
The second reason for an elevation is that storage is a stack of clearances rather than a set of shapes. A shelf is not 12 inches of anything; it is a board plus the space above it, and the space above it has to clear the tallest thing that will sit there with enough room left to lift that thing out. On paper, that stack is a column of counted squares, and you can add it up before you own any lumber.
Measure the Opening First, and Measure the Width Three Times
Everything after this depends on the numbers you write down now, so take them before you draw anything. Work in inches and write fractions rather than rounding, because the rounding is where a shelf ends up half an inch too long.
What to Write Down
- Width, three times: at the floor, at about four feet, and near the ceiling. Walls are rarely parallel, and the number you build to is the smallest of the three.
- Height: floor to ceiling, at both ends of the opening. An out of level floor shows up here as a difference between the two.
- Depth: the finished face of the back wall to the inside face of the trim, not to the outside of the door frame.
- The door: which kind, how wide each leaf is, and how far it projects into the room when fully open. Measure the projection with the door open rather than working it out.
- What is already in there: an existing rod and its height, a light fixture and its lowest point, a shelf cleat, an access panel, a heating duct, a sloped ceiling, the baseboard and its height and thickness.
The Measurement Everyone Skips
Measure your own reach. Stand at the opening, hold a filled box at chest height, lift it as high as you can comfortably place it, and have somebody mark the wall at the bottom of the box. That one pencil mark decides which shelves are for things you use weekly and which are for the suitcase, and it is personal: a plan drawn to a generic number will put the everyday shelf out of reach for somebody and waste good space for somebody else.
While you are there, find the framing. Studs are commonly 16 inches on center in American construction and sometimes 24, which on this sheet is every eighth or every twelfth grid line, so once one is found the rest can be stepped off on the drawing. Mark the ones you actually find with a stud finder rather than trusting the count, because an opening that was framed around a duct will break the spacing exactly where you were counting on it.
The Wall Sheet: Thirty Seven Squares Across, Fifty Down
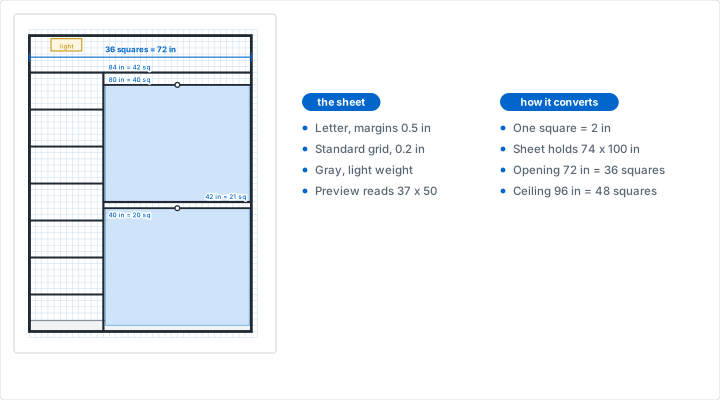
Open the generator, leave it on Letter and imperial, and set the grid size to 0.2 inches. Keep the four margins at the 0.5 inches the paper preset gives you. The line under the preview then reads 37 squares across x 50 squares down. Set the line color to gray and the line weight to light, so that every line you draw reads more strongly than the printed grid under it.
Letter inside half inch margins is 7.5 by 10 inches. At 0.2 inches that is 37 whole squares across and 50 down, and the only remaining decision is what one square stands for.
Why Two Inches to the Square
Two inches is the scale that fits a closet and still divides. At two inches a square:
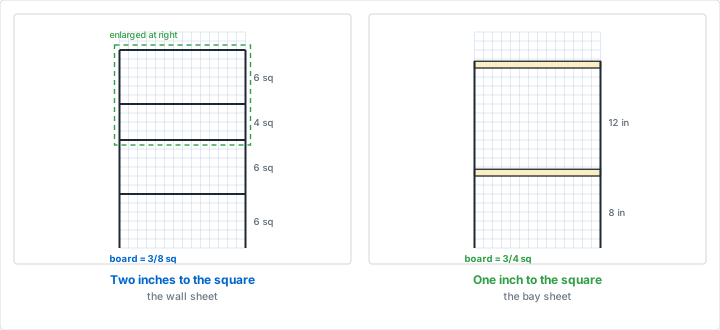
- The sheet covers 74 inches of width and 100 inches of height, so a 72 inch opening under a 96 inch ceiling lands inside it with a square spare across and two up.
- Every common shelf dimension is a whole number of squares: a 12 inch depth is 6, a 16 inch depth is 8, a 24 inch depth is 12, and gaps of 10, 12, 14, 16 and 18 inches are 5, 6, 7, 8 and 9.
- Framing at 16 inches on center is 8 squares, so stud lines fall on printed lines.
- A three quarter inch board is three eighths of a square, which is too small to draw as a thickness. You draw it as a single line and account for it in the arithmetic instead, which is the trade the next section is about.
If your opening is wider than 74 inches, you have two honest options. Change the scale to three inches a square, which drops the grid to 0.25 inches on the same paper and covers 90 by 120 inches, or keep two inches and print the wall on a Ledger sheet, which at 0.2 inches is 80 squares across by 50 down and covers 160 inches of width. A walk-in closet is usually three or four separate elevations rather than one wide sheet, one for each wall, taped side by side.
The Bay Sheet at One Square Per Inch
The wall sheet answers where things go. It cannot answer what to cut, because at two inches a square the board thickness is invisible, and the board thickness is what makes a shelf 70.5 inches instead of 72. So draw one bay again on a second sheet at one square to the inch: Letter at 0.25 inches is 30 squares across by 40 down, which is 30 inches of width and 40 inches of height, about the size of one shelf bay or one pantry cupboard section.
At that scale the three quarter inch board is three quarters of a square, drawn as a real thickness with the shelf surface on the top line of it, and you can count the gap above each shelf directly in inches. Keeping two scales on one project straight is its own small discipline, and the method is the one from our post on gingerbread house templates: write the scale in the corner of every sheet, in ink, before you draw a single line on it.
Drawing the Shell and What Is Already There
Start with the outline, and start it on a printed line rather than in the middle of a square. Count the width in squares along the bottom of the sheet, mark both ends, and carry the two sides straight up. For the worked example in this article the opening is 72 inches wide, 96 inches to the ceiling and 24 inches deep: 36 squares across, 48 up.
Then draw, in a lighter pencil or a second color, everything already inside the shell that you are not going to move:
- The baseboard, as a strip along the bottom. Anything that has to sit flat against the wall either stops above it or gets notched around it.
- The light fixture, as a box hung from the ceiling line, at its lowest point. The top shelf has to clear it, and so does the door.
- Any obstruction: a duct boxed into a corner, a sloping ceiling, the header above the opening, a window.
- The vertical center line of the opening, which is where a pair of doors meets and where a single tall divider usually wants to go.
Draw this layer before anything you are adding. It kills plans cheaply at this stage and expensively later, and it is the same pass our post on model railroad track plans makes first: establish what cannot move, then design inside what is left.
Keep the drawing in pencil, and print four copies of the wall sheet so you can try four arrangements side by side rather than erase one. Cutting shelves out of a second sheet as paper strips and sliding them up and down works too, which is the trick the room layout tutorial uses for furniture.
Where Do the Shelves Go? Spacing Comes From What Sits On Them
Shelf spacing is not a style choice, and it is the one place where a bought shelving plan is almost always wrong for your things. The rule is three steps, and it ends in a count of squares:
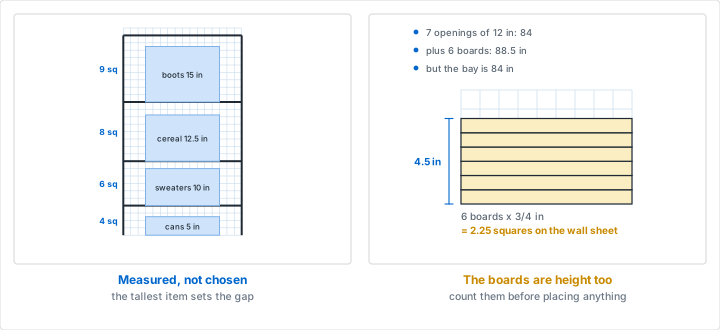
- Measure the tallest item in the group, standing the way it will stand.
- Add room to lift it out. Two inches is enough for a box or a stack and gives you somewhere to get your fingers; a bin you have to tilt forward to clear its own lip needs more.
- Round up to the next whole square, which at two inches to the square is the next even inch.
Then add the board. Six shelves of three quarter inch stock take up four and a half inches of the height all by themselves, and that is more than two squares on the wall sheet. Count the openings, then count the shelves, then check that openings plus boards equal the height you measured. If the two do not agree, the drawing is lying to you and the bottom shelf is where the error will land.
Here is one pantry measured, written out to show the shape of the arithmetic rather than to be copied. Measure yours; the numbers will be different and the method will not be.
| What the shelf holds | Tallest item | Plus lift room | Opening in squares |
|---|---|---|---|
| Cans and jars, single row | 5 in | 7 in | 4 squares, 8 in |
| Boxed cereal and crackers | 12.5 in | 14.5 in | 8 squares, 16 in |
| Folded sweaters, stack of five | 10 in | 12 in | 6 squares, 12 in |
| Shoes, flat | 5.5 in | 7.5 in | 4 squares, 8 in |
| Shoes, boots upright | 15 in | 17 in | 9 squares, 18 in |
| Storage bins with lids | 13 in | 16 in | 8 squares, 16 in |
| Small appliance, lid opening upward | 14 in | 20 in | 10 squares, 20 in |
Fixed, Adjustable or Both
Draw the fixed shelves first and the adjustable ones second, in a different color, because they cost different amounts of planning. A fixed shelf braces the whole unit and has to be right the first time. An adjustable shelf on pins or standards can move later, which means its exact height matters much less than whether the pin holes go high enough to be useful.
A sensible mix for a closet tower is a fixed shelf at the top, a fixed shelf roughly in the middle, and adjustable shelves between them. On the drawing, mark the pin hole range as a dashed line up both sides of the bay with the first and last hole positions counted in squares, so you can see at a glance that the range actually covers the gaps you want. What a given shelf will carry is a question for the instructions that come with the standards, brackets or pins you buy, and not something a drawing can answer: take the span and the bracket count from those instructions, and use the drawing to check that the spans they allow land where your studs are.
Hanging Space: Rod Heights and the Double Hang
A rod height is set by the length of what hangs from it, measured from the top of the hanger hook to the hem. Hang your longest shirt, your longest coat and a pair of trousers folded over a hanger, measure all three, and write the numbers on the drawing. The worked example below uses 38 inches for shirts and jackets and 52 inches for a long coat, which are generous; yours may well be shorter.
The arithmetic is then subtraction. A rod at 66 inches with a 38 inch shirt on it leaves 28 inches of clear floor underneath, which is a shoe row and then some. The same rod with a 52 inch coat leaves 14 inches, which is one row of shoes and nothing else. On the wall sheet at two inches a square, that is a rod line at 33 squares, a hem line at 14 squares, and the space between them countable without a tape.
A double hang doubles the hanging length in the same width, and it divides cleanly on this sheet. For a 48 inch wide section of the worked example:
- Lower rod at 40 in, 20 squares: a 38 inch shirt hangs to 2 inches off the floor.
- Divider shelf at 42 in, 21 squares: the lower rod hangs from a bracket under it.
- Upper rod at 80 in, 40 squares: 38 inches of hanging space above the divider shelf.
- Top shelf at 84 in, 42 squares: which leaves 12 inches to the 96 inch ceiling for flat storage above.
Every one of those is a whole square, which is not a coincidence: two inches to the square is what makes rod heights and shelf heights land on printed lines. Draw each rod as a small circle in section with a dashed line across the width, and draw the garments hanging from it as a plain rectangle. That rectangle is the honest part of the drawing, because a rod with nothing under it always looks like it has more room than it has.
A double hang only works where everything in that section is short. One long coat in a double hang section means the coat lives somewhere else, so mark one bay on the drawing as full height single hang before you commit to the rest. Counting a fixed width into sections like this is the same move as the desk rows in our seating chart tutorial: fix the unit first and the layout is forced rather than argued over.
Depth, Reach and the Door: Three Clearances Worth Drawing
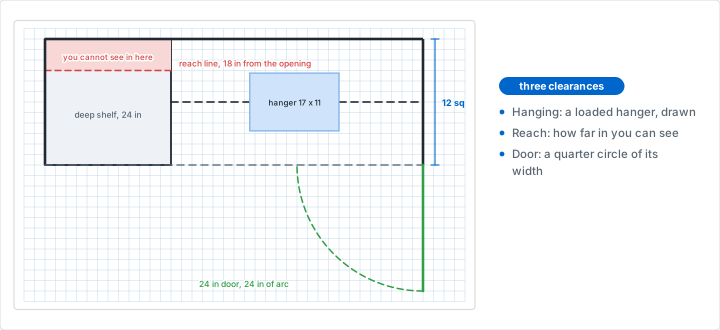
The elevation holds the heights. Three clearances are about depth instead, so give them a strip across the foot of the sheet, drawn as a plan looking down: the opening across, the depth up, at the same two inches to the square.
Hanging depth. Measure a loaded hanger across and front to back, with the bulkiest coat on it. The rod has to sit far enough off the back wall that nothing touches it, and far enough inside the front that nothing is caught by the door. Draw the hanger as a rectangle on the plan strip and you will see immediately whether a 24 inch deep closet has room for a shelf behind the rod. Usually it does not.
Shelf depth against reach. A shelf deeper than your forearm reach has a back half that becomes archaeology. Draw the depth you are planning, then draw your reach as a second line on the plan strip, and if the reach line falls short, either reduce the depth or plan for a bin that pulls out. A pantry is the clearest case: cans two rows deep are two rows you can see, and cans four rows deep are two rows you can see and two rows that expire.
The door. A hinged door of width W sweeps a quarter circle of radius W, so a 24 inch door needs 24 inches of clear floor outside the opening and nothing in the first 24 inches inside it either, on the hinge side. Draw the arc with a compass on the plan strip. A bifold projects into the room by roughly half a leaf, which is why you measured it rather than calculating it. A bypass or sliding door swings nothing but hides half the opening at all times, so draw the overlap as a shaded strip: anything that needs to be grabbed without thinking belongs outside that strip. Clearances in front of the closet, in the room, belong on the floor plan instead, and the room layout tutorial lists them.
From the Drawing to a Cut List and a Shopping Count
A finished elevation already contains the cut list; it just needs reading off in the right order. Work from the bay sheet at one square to the inch, where the board thicknesses are drawn, rather than from the wall sheet.
The subtraction that matters is the one for a shelf between two uprights. Nominal lumber is not its actual size: a nominal 1x12 board is 3/4 inch thick and 11-1/4 inches wide as sold, and plywood sold as 3/4 inch is often slightly under. So a shelf fitting inside two 1x12 uprights in a 72 inch opening is not 72 inches but 70.5, and a shelf resting on cleats fixed to both side walls is the full width less about an eighth of an inch so it will go in at all. Our woodworking post works through nominal against actual sizes and the saw kerf that eats an eighth of an inch at every cut.
For the 24 inch wide shelf tower in the worked example, built from nominal 1x12 and standing 84 inches tall with six shelves:
- 2 sides: 84 in each, 168 in total.
- 6 shelves: 24 in less two thicknesses of 3/4 in, so 22.5 in each, 135 in total.
- 1 back cleat: 22.5 in.
- Running total: 325.5 in, which is 27 feet 1.5 inches.
- Buy: three 10 foot boards. Nine cuts at an eighth of an inch of kerf is just over an inch of waste, and the spare covers one mistake.
Note what the tower's depth does to the plan strip. A nominal 1x12 shelf is 11.25 inches deep, which at two inches a square is five and five eighths squares: the one number on the whole job that the wall sheet cannot show you honestly, and the clearest argument for the second sheet at one square to the inch.
Number each part on the drawing and write the same number on the cut list, so a board in the car can be matched to a place on the wall. If the plan has to carry a typed title block, a parts table or a name and date, build the sheet in a document rather than writing on it, by the sizing method in our post on putting graph paper in a document.
Pantry, Linen and Garage Shelves: The Same Sheet, Different Numbers
The sheet does not change from room to room; only the clearances do.
A pantry wants shallow shelves and many of them. Depth is the enemy, so plan 12 to 16 inches, which is 6 to 8 squares, and spend the height you save on more shelves. Draw the tall items first: the cereal boxes and the oil bottles set the one deep opening, and everything else can be tight above and below it. One shelf at 20 squares of opening and five at 4 is a better pantry than six at 8.
A linen closet is the opposite: folded stacks are soft and roughly uniform, so even spacing really does work, and the useful drawing is the width. Measure a folded sheet set and a folded towel, count how many fit across the shelf, and you will usually find the shelf is wide enough for either two stacks or three, with nothing in between. Mark the stack divisions on the elevation in dashed lines so the shelf has lanes.
A garage or basement wall changes the constraint again: the shelves are deep, the loads are awkward, and the uprights have to land on studs. Here the stud lines on the drawing stop being a convenience and become the layout, so draw them first, at 8 squares apart for 16 inch centers, and then fit the bays between them. Bins are the unit rather than items, so measure one bin and draw it, the way the raised beds in our garden planning tutorial are drawn as a repeated module instead of one shape at a time.
For any of the three, if you want to see the finished unit rather than just its front, redraw the settled bay on isometric paper, where depth, width and height all stay to scale in one view. A technical elevation with heavy lines every few squares is easier to read on engineering paper, whose darker line every fifth square gives you a built in ruler up the page.
Which Generator Settings Should You Use?
| What you are drawing | Paper and grid | Squares | One square | Area it covers |
|---|---|---|---|---|
| A reach-in closet wall | Letter, 0.2 in | 37 x 50 | 2 in | 74 x 100 in |
| The same wall, bigger squares | Letter, 0.25 in | 30 x 40 | 3 in | 90 x 120 in |
| One bay, with board thicknesses | Letter, 0.25 in | 30 x 40 | 1 in | 30 x 40 in |
| A drawer or spice shelf, actual size | Letter, 1 in | 7 x 10 | 1 in | 7 x 10 in |
| A walk-in or garage wall | Ledger, 0.2 in | 80 x 50 | 2 in | 160 x 100 in |
| The metric sheet | A4, 5 mm | 38 x 55 | 5 cm | 190 x 275 cm |
| The floor plan that goes with it | Letter, 0.25 in | 30 x 40 | 1 ft | 30 x 40 ft |
Every row uses the standard square grid in gray at the light weight, with the margins the paper preset gives you: 0.5 inches on the imperial sheets and 10 mm on A4. Check the square count under the preview against this table before you print. If it disagrees, a margin has been changed or the grid unit was switched after the number was typed.
Two rows deserve a word. The one inch sheet is 7 squares by 10, which sounds useless until you need a drawer divider or a spice rack at full size and can lay the object on the paper and trace it. The last row is the scale our room layout tutorial uses, so printing it on the back of the wall sheet keeps both drawings of one closet together. For a sheet you will write all over, dot grid paper at the same spacing gives the same counting with far less ink competing with your lines.
Which Mistakes Make a Shelf Plan Useless?
Mistake: One Width Measurement
Problem: The opening measured 72 inches at the floor, so every shelf was cut to 70.5. Three of them will not go in, because the wall bows and the opening is 71.5 inches at mid height.
Solution: Measure the width at the floor, at four feet and near the ceiling, write all three on the drawing, and build to the smallest. Where the difference is more than a quarter inch, support the shelves on cleats rather than cutting them to a press fit.
Mistake: Shelves With No Thickness
Problem: Six evenly spaced shelves were drawn as six lines, so the drawing shows seven openings of 12 inches in an 84 inch bay. The boards take four and a half inches of that, and the bottom opening comes out at seven and a half.
Solution: Add the boards up before you place anything: shelves times thickness, subtracted from the height, and what is left is what the openings share. Then check the column on the bay sheet, where three quarters of an inch is three quarters of a square and visible.
Mistake: Planning From the Door Frame
Problem: The depth was taken from the outside of the door casing, so the drawing has an inch and a half of depth that does not exist, and the shelf that was meant to sit behind the rod fouls the clothes.
Solution: Measure inside the trim, to the finished faces that a board will actually touch, and draw the trim as its own strip on the plan so you can see what it costs. Then put a loaded hanger on the plan before you decide anything goes behind the rod.
Mistake: Shelves Nobody Can Reach Or See Into
Problem: The plan used every inch of height and depth, so the top shelf needs a step and the bottom of the 24 inch deep shelves needs a flashlight. The closet holds more and stores less.
Solution: Put your measured reach line on the elevation and your forearm reach on the plan strip, in ink, before you place a shelf. Above the one and behind the other, plan only for things you move twice a year, and say on the drawing which shelf those are.
Mistake: Fit to Page in the Print Dialog
Problem: The sheet printed at 96 percent, so the squares are 0.192 inches rather than 0.2. Every count is still right and every measured line is wrong, which is the worst combination, and it only surfaces when a ruler comes out.
Solution: Set the print scale to 100 explicitly, then measure ten squares on the first sheet: at 0.2 inches they span exactly 2 inches. Our printing tips guide covers the dialog settings that cause this.
The Bottom Line
Storage goes wrong for a reason that has nothing to do with taste: the decisions are vertical and the drawing is usually horizontal, so the clearances never get added up. An elevation turns every one of them into a count. Pick two inches to the square and a 16 inch gap is eight squares, a 12 inch shelf is six, a rod at 80 inches is 40, and six boards of three quarter inch stock are the two and a quarter squares you would otherwise have found at the bottom of the last bay.
So print the wall sheet: Letter, 0.2 inch squares, gray at the light weight, 37 across by 50 down. Draw the shell, then everything you cannot move, then the shelves from the top down and the rod from the hem up. Add the plan strip at the foot for depth, reach and the door arc. Then print the bay again at one square to the inch, put the board thicknesses in, and read the cut list off the drawing. The whole thing takes an evening, and it costs a sheet of paper instead of a trip back to the store with shelves that are half an inch too long.
Print Your Closet Wall Sheet
A standard square grid at 0.2 inch squares on Letter in light gray: 37 across by 50 down, which covers 74 by 100 inches of wall at two inches to the square. Free, with no account and nothing to install.
Create Your Wall SheetRelated Resources
- How to Plan a Room Layout: the floor plan this elevation belongs beside, and the clearances in front of the closet
- Woodworking and DIY Project Plans: views, dimensioning, nominal against actual lumber sizes and the saw kerf
- Engineering Graph Paper: a heavier line every fifth square, which reads as a ruler up an elevation
- Isometric Graph Paper: the settled bay drawn in three dimensions without a second scale
- Garden Planning on Graph Paper: the same measure-first method with beds as the repeated module
- Gingerbread House Templates: two scales on one project, and how to keep them apart
- Model Railroad Track Plans: clearances and reach deciding what fits in a fixed space
- Professional Printing Tips: the settings that keep a 0.2 inch square 0.2 inches