How to Make a Seating Chart on Graph Paper
Most seating charts fail for the same reason: they are drawn as a diagram rather than as a measurement. A list of tables numbered one to twelve says nothing about whether twelve tables fit in the room, and a classroom sketch with five neat rows says nothing about whether a student can reach the door. Graph paper fixes both, because every square stands for a fixed number of feet and a plan that overflows the paper overflows the room. This tutorial covers the whole process for a classroom and for an event: measuring the space, drawing tables and desks at true size, leaving the aisles before you seat anybody, and building name tiles you can slide around until the arrangement works.
Why Graph Paper Beats Guesswork
Advantages Over a Written List
- Capacity becomes arithmetic: Tables drawn to scale either fit inside the walls or they do not, which a numbered list can never tell you
- Aisles are visible: Circulation space is the thing lists always omit and the thing guests and students notice first
- Positions carry meaning: "Table 6" tells a server nothing; a plan tells them where to stand
- One page briefs everyone: A caterer, a substitute teacher, or a venue coordinator can read a scale plan without explanation
- Changes stay honest: Adding two guests forces you to find the floor space for them rather than writing another name in a margin
Advantages Over Seating Chart Apps
- Your room is not a template: Real rooms have pillars, alcoves, service doors and immovable projector screens, and template-based tools rarely let you draw them
- Rearranging is physical: Sliding paper tiles across a plan is faster than dragging names between lists, and easier to do with someone else at the table
- It survives the venue: Paper works in a hall with no signal, on a gym floor, and in a classroom the week before the network is switched on
- No account, no export fee: Print another sheet and start again
- Annotation is free: Allergies, accommodations, feuding relatives and "must be near the door" all fit in the margin
Which Grid Style?
Use the standard square grid for the plan itself. Every line is a measurement reference, which is exactly what you need when a wall is 27 feet 6 inches long. If you want a cleaner finished chart to hand to somebody, redraw it on dot grid paper: the dots guide your pencil but almost disappear in a photocopy, so table numbers and names dominate the page. For laying out chairs evenly around a large round table, a sheet of polar graph paper does the angular arithmetic for you.
Step 1: Measure the Room and Choose a Scale
Measure the room wall to wall, at floor level, and write the numbers down before you draw anything. Then record the position of every fixed feature, measured from the nearest corner rather than from another feature: doors and which way they swing, windows, the whiteboard or stage, columns, radiators, floor outlets and the service entrance the caterer will use. Position is what a plan needs. A door "three feet wide" is not enough; a door "three feet wide, starting six feet from the north-west corner" can be drawn.
The scale then decides how much of that fits on one sheet. Pick the largest scale on which the whole room still fits, because detail you can see is detail you will use.
Recommended Scales
Classrooms and Meeting Rooms (up to about 1,000 sq ft)
- 1 square = 1 foot: The default. A 30 by 30 foot classroom is 30 squares each way, which on a quarter-inch grid is 7.5 inches - comfortably inside a US Letter sheet with margins. Individual desks are two squares by one and a half, big enough to write a name in
- 1 square = 6 inches: For a small seminar room or a computer lab where cable runs and monitor depths matter
Banquet Halls, Gymnasiums and Marquees
- 1 square = 2 feet: Fits a 60 by 80 foot hall onto a Letter sheet at 30 by 40 squares. A 60-inch round table is two and a half squares across, which is enough to place but too small to label clearly
- 1 square = 4 feet: For a hall over about 100 feet in either direction, or for the first rough pass before you commit
- Two sheets: The practical answer for a large event. Draw the whole room at 1 square = 4 feet to fix the zones, then draw one populated quadrant at 1 square = 1 foot to check clearances properly
Whichever you choose, write the scale on the sheet before you draw the first wall. A plan whose scale is remembered rather than recorded is worthless a week later, and every seating chart gets looked at again. If you are unsure which grid spacing suits your room, the grid size guide works through the same trade-off in general terms, and the printing tips matter here more than usual: print with page scaling turned off, then measure a square with a ruler. A grid printed at 96 percent quietly makes every dimension on your chart wrong.
Step 2: Draw the Room Shell and Its Fixed Points
Draw the walls first, in a heavy line, working around the room in one direction so you do not lose track of which measurement you are on. Where a wall length does not land on a whole square, round to the nearest half square and note the true figure beside it. Rounding down is safer than rounding up: a plan that thinks the room is slightly smaller than it is will never produce an arrangement that fails to fit.
Then add everything that cannot move, before anything that can:
- Doors, with their swing: Draw the swing arc. A door opening inward eats a quarter circle of floor that no chair may occupy
- The focal point: The whiteboard, screen, stage, altar or head table. Everything else is arranged relative to it
- Columns and structural features: Draw them at true size and shade them. A 24-inch square column is one square on a 1 square = 2 feet plan and will hide two guests from the stage
- Service routes: The kitchen door, the bar, the buffet line, the trash station. These consume more floor than people expect and they must connect to open floor, not to the back of a table
- Fixed technical positions: Sound desk, projector cart, floor boxes and any cable run that must be taped down and therefore must not cross a walking route
This is the same discipline as drawing a floor plan for furniture, and if you have not done it before the room layout tutorial covers measuring and shell drawing in more detail. A seating chart is a floor plan whose furniture happens to be tables and whose constraint happens to be people.
Step 3: Draw Tables and Desks to Scale
Draw the furniture at its real footprint, not at the size that makes the plan look tidy. Every mistake in a seating chart traces back to a table drawn slightly small.
Round Tables
- 60-inch round (5 feet): Seats 8 comfortably, 10 at a squeeze. The most common banquet table in the United States
- 72-inch round (6 feet): Seats 10 comfortably, 12 at a squeeze
- 48-inch round (4 feet): Seats 6. Common in smaller venues and for children's tables
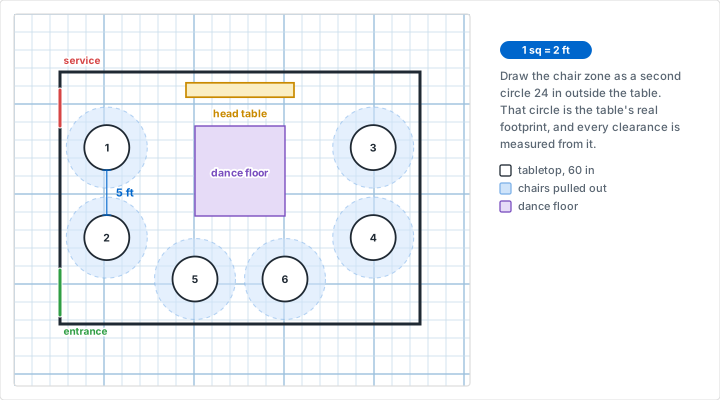
Draw the tabletop as a circle, then draw a second, larger circle around it for the chair zone. A seated guest with the chair pulled out needs about 24 inches behind the table edge, so a 60-inch round occupies a 9-foot circle of floor once it is in use. That second circle is the one that has to fit, and drawing it is the single most useful habit in this whole process.
Spacing chairs evenly around the circle is where the grid stops helping, because a square grid has no angles in it. Eight chairs around a table sit at 45-degree intervals and ten sit at 36 degrees, neither of which a square grid marks. Print one sheet of polar graph paper and draw your table templates on that instead: its radial spokes give you the divisions directly, and 12 spokes divide cleanly for tables of 12, 6, 4 and 3. For 8 or 10 places, halve the angle between spokes by eye - the error that matters is in the floor space, not in the chair positions.
Rectangular Banquet Tables
- 6-foot table (72 by 30 inches): Seats 6 with three a side, or 8 with one at each end
- 8-foot table (96 by 30 inches): Seats 8 with four a side, or 10 with the ends used
- Allow 24 inches of table edge per guest: This is the number that decides how many people a long table really seats, whatever the venue's list says
Long tables are far more space-efficient than rounds for the same guest count, because two tables can share the aisle between them. They also make conversation harder across the width and impossible along the length, which is a social decision rather than a drawing one. Draw both arrangements on separate sheets and compare the floor they leave over.
Classroom Desk Arrangements
- Standard student desk: About 24 by 18 inches, so two squares by one and a half at 1 square = 1 foot
- Two-seat table: Typically 48 by 24 inches
- Group table: 60 by 30 inches or a 48-inch round for four to six students
- Teacher desk: About 60 by 30 inches, plus a chair zone behind it
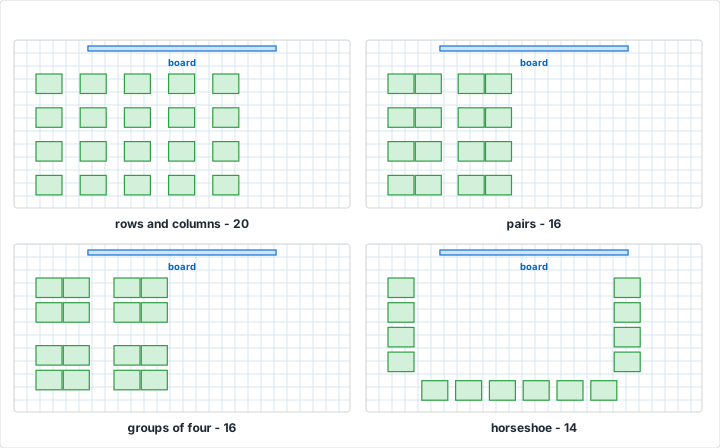
The four standard arrangements each have a characteristic failure that a scale plan catches immediately. Rows and columns fit the most students but put the back row a long way from the board. Pairs work well for discussion and add an aisle for every two desks, which costs more floor than teachers expect. Groups of four seat a class socially but turn half the students away from the front, so every one of them must turn around to see a demonstration. The horseshoe is the arrangement that most often does not fit at all: it needs enough wall-facing perimeter for every student, and a class of 30 in a standard classroom will not have it. Drawing it to scale is quicker than discovering that with 30 desks in your hands.
Step 4: Leave the Aisles Before You Seat Anyone
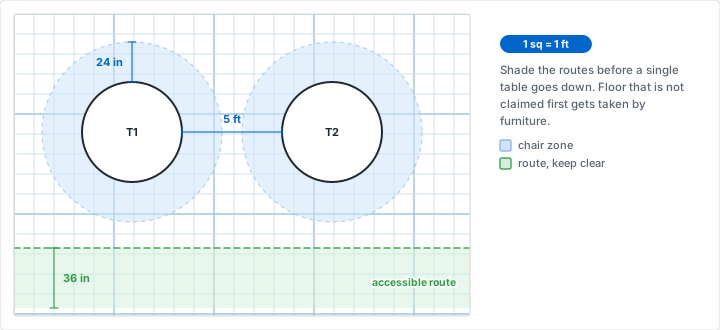
Draw the circulation space onto the plan as a shaded route, before you place a single table. Space that is not claimed first gets consumed by furniture, and the aisle is the part of the room that everyone uses and nobody owns.
- Between round tables: 60 inches edge to edge. This covers two guests pushing their chairs back plus a server passing between them. Below about 54 inches, servers cannot get through once the room is seated
- Main service aisle: 6 feet, more if a buffet or a trolley runs down it
- Between classroom rows: 36 inches, and never below 30. This is the difference between a teacher who can reach every student and one who works from the front
- Accessible routes: 36 inches of clear width minimum, with a 60-inch circle wherever a wheelchair user needs to turn around. Draw that circle on the plan at any wheelchair position and at the end of any route
- Exit paths: Every exit needs a clear route to it from every part of the room. Check your local fire code for the required width; whatever the number, the route has to be drawn and kept empty, not assumed
- Around a dance floor: Allow 2 to 4.5 square feet per dancing guest and assume around 40 percent of guests dance at once, which puts a 100-guest wedding at roughly 400 square feet - a 20 by 20 foot square
A useful check on total capacity before you start placing anything: a seated banquet on round tables needs 12 to 15 square feet per guest including aisles and service space. Multiply your guest count by 12, compare it with the room's floor area minus the dance floor and the stage, and you will know immediately whether the arrangement you have in mind is possible. Venues quote a maximum capacity that usually assumes no dance floor, no bar and no buffet.
Step 5: Make Name Tiles You Can Move
Do not write names onto the plan. Write them onto something you can move, and the chart stops being a drawing you defend and becomes a model you test.
- Print a second sheet at the same grid spacing. Same scale, same squares - this is the only thing that keeps the tiles honest
- Cut a tile per table or per desk, sized to the footprint you established in step 3, including the chair zone for a round table
- Label each one with its identifier and its capacity: "T4 / 8" or "desk 12". For a wedding, put the guest names on the back
- Color-code by category: family, work, university friends, and so on for an event; reading group or accommodation need for a classroom. A highlighter down the edge of each tile is enough
- Hold them with removable putty so an arrangement survives the plan being carried to the venue and back
Index cards work as well as cut paper for a classroom, where the tiles get handled daily and want to be sturdy. Cut card stock or laminate them if the chart is going to live on a clipboard for a term. The technique is the same one used for furniture templates in a floor plan, and it works for the same reason: the hard part of the problem is arrangement, and arrangement is best done with your hands.
Step 6: Seat the Room, Then Test the Chart
Place the tiles in constraint order, hardest first. Wheelchair users and anyone with a mobility need go first, because their positions are decided by the routes you drew in step 4 rather than by preference. Then the head table or the teacher's desk. Then anyone who must be near an exit, near the front, or away from a speaker. Only after all of those go the people whose position is a matter of preference. Working in this order means the difficult constraints are satisfied by the geometry rather than by rearranging a finished chart.
Sight Lines
Pick the focal point - the board, the stage, the head table - and draw a straight pencil line from it to each seat that must be able to see it. Any line that passes through a column, a speaker stack, a buffet or the back of another guest is a seat you have just found a problem with. At a round table, the two guests seated with their backs to the stage will spend the speeches turned sideways; that is unavoidable, but it should be a choice about who sits there rather than an accident. In a classroom, run the same lines from the whiteboard and check them against the projector screen position too, because the two are rarely in the same place.
The Walk-Through Test
With the room seated, trace these routes on the plan with a fingertip and confirm each one stays inside the shaded circulation space:
- Kitchen or service door to the furthest table, and back
- Every table to the nearest exit
- Every table to the restrooms and to the bar
- The wheelchair route from the entrance to its seat, with the 60-inch turning circle at each end
- In a classroom: the teacher's route to every single desk, and every student's route to the door, the pencil sharpener and the supply shelf
A route that requires someone to turn sideways is a route that fails on the night, when the chairs are pulled out further than you drew them.
Classroom Seating Charts
Who Goes Where
A classroom chart carries information a plan of an event does not, and the margin is where it goes. Note the students who need to be near the front for a documented accommodation, the pairs who work well together, the pairs who do not, and anyone who needs an unobstructed route to the door. Keep those notes in pencil and keep the tiles movable: the first arrangement of a new class is a hypothesis, and you will revise it in the second week.
Rotate the arrangement each term rather than each week. Students settle into a layout, and the point of a scale plan is that trying the next rotation costs ten minutes with the tiles instead of an afternoon of moving desks to discover the horseshoe does not fit.
The Substitute Copy
Photocopy the finished chart, write the date on it, and leave it in the substitute folder. A substitute teacher with a scale chart knows where every student sits and can take a register by looking at the room. Keep the copy flat and simple - names and desk positions only, none of the pencil notes - because it is a document that leaves your hands. This is also the point at which a redraw on dot grid paper pays off: the grid disappears in the copy and the names stay legible.
For a wider view of graph paper across the school year, from lab sheets to lesson planning, the school graph paper guide covers which ruling suits which subject.
Wedding and Event Seating Charts
How Many Tables Do You Need
Divide the guest count by the seats per table and round up, then add one. A 120-guest wedding on 60-inch rounds at 8 per table is 15 tables, so plan for 16: late acceptances, a table that ends up with 6 because of who cannot sit with whom, and the vendor meals people forget to count. Draw the spare table on the plan in a dashed outline so you know where it would go, and where the floor for it comes from.
The Head Table
The head table is drawn first and it is the hardest piece to place. A long head table seats guests on one side only, so it needs twice the table length per person - allow 30 inches of edge each rather than 24 if guests are seated in a row on show. It must have a clear sight line to and from most of the room, and it must not sit in the service route. A sweetheart table for two is a quarter of the footprint and solves most of these problems at once.
The Working Chart and the Display Chart
These are two different documents and conflating them is the usual mistake. The working chart is the scale plan: it goes to the venue and the caterer, and it shows table positions, numbers, capacities, the dance floor, the service routes and the allergy notes. The display chart is what guests read on the way in: alphabetical by surname with a table number, or a table-by-table list, with no floor plan and no scale. Guests do not need to know where table 9 is until they are looking for it, and a scale floor plan on an easel is genuinely harder to read than a list.
Draw the working chart first and derive the display chart from it, never the other way around. Every change to seating updates the plan, and the display list gets written once, at the end, from the finished plan.
Common Mistakes
Mistake 1: Drawing the Table Instead of the Table Plus Its Chairs
Problem: The plan shows twelve 60-inch rounds fitting neatly, and on the night the room is impassable once everyone sits down.
Solution: Draw the chair zone as a second circle 24 inches outside the table edge, and treat that circle as the table's real footprint. A 60-inch round is a 9-foot object in use. Every clearance in this tutorial is measured from that outer circle, not from the tabletop.
Mistake 2: Trusting the Venue's Capacity Number
Problem: The hall is quoted at 200 seated and your 160-guest wedding will not fit.
Solution: Quoted capacities usually assume tables and nothing else - no dance floor, no bar, no buffet line, no stage, no gift table. Subtract every one of those from the floor area on your own plan before you count seats. This is exactly the arithmetic a scale drawing does for you and a booking confirmation does not.
Mistake 3: Seating People Before Drawing the Aisles
Problem: The tables are placed, the guests are assigned, and there is no clean route from the kitchen to the far side of the room.
Solution: Shade the circulation routes onto the plan in step 4, before any table goes down, and treat the shaded area as unavailable floor. It is far easier to fit tables around a fixed aisle than to find an aisle inside a fixed arrangement.
Mistake 4: Printing the Grid at the Wrong Scale
Problem: The plan is drawn carefully, the tables are measured correctly, and the whole thing is out by four percent because the printer shrank the page to fit.
Solution: Print with scaling set to 100 percent or "actual size", never "fit to page", then check with a ruler that ten squares measure what they should before you draw anything. On a long hall a four percent error is more than three feet - an entire aisle.
Tips for Better Seating Charts
- Number the tables on the plan and nowhere else first. Table numbers should follow the route a guest walks from the entrance, not the order you happened to draw them
- Draw north, or draw the main entrance, on every sheet. A plan without an orientation mark gets read upside down by somebody
- Keep the rejected arrangements. When the venue moves the bar the week before, the layout you discarded for that reason is often the one you now want
- Photograph the finished plan before it goes into a bag with a hundred other things
- Put the scale, the date and your name on the sheet. Seating charts get handed to people who will not be able to ask you what a square means
- Work in pencil. Every seating chart changes at least three times, and the last change usually arrives after the chart is finished
Conclusion
A seating chart drawn to scale answers the questions that matter before they become problems on the day: whether the tables fit, whether the servers can get through, whether the student at the back can see the board, and whether the wheelchair user has a route rather than a space. None of that is visible in a list of names, and all of it is obvious on a grid where one square is one foot.
Print the paper, draw the shell, shade the aisles, cut the tiles, and move them until the plan stops fighting you. Then keep the sheet. The next event in the same room, or the next class in the same room, starts from a measured drawing instead of from a tape measure and an afternoon.
Ready to Draw Your Seating Chart?
Generate graph paper at the scale your room needs. Quarter-inch squares on US Letter give you 1 square = 1 foot for a classroom, or 1 square = 2 feet for a banquet hall.
Create Graph Paper NowRelated Resources
- How to Plan a Room Layout - measuring a space and drawing the shell
- Planning Your Garden on Graph Paper - the same scale drawing applied outdoors
- Design Sketching on Graph Paper - keeping proportion across a page of variations
- Dot Grid Paper - the cleaner ruling for a chart you hand to someone
- Polar Graph Paper - laying out chairs evenly around a round table
- School Graph Paper by Subject - which ruling suits which class
- Coordinate Graphing Mystery Pictures: the other classroom sheet this generator gets printed for
- Types of Graph Paper - every ruling the generator produces
- All graph paper tutorials