Composing Music on Graph Paper: Manuscript Grids, Tabs, and Rhythm Charts
Music is one of the most grid-like things humans make. Pitch runs up and down, time runs left to right, and almost every way we write music down is really a chart with those two axes. Long before notation software, composers, arrangers, and songwriters worked out their ideas on paper, and a sheet of graph paper is still one of the fastest, most flexible tools for the job. The pre-printed squares give you evenly spaced beats, consistent line heights for a staff, and a ready-made canvas for tablature, drum patterns, and song maps. Whether you read standard notation fluently or cannot tell a treble clef from a paperclip, a grid lets you see the shape of a piece of music and move ideas around before you commit them to an instrument or a screen.
Why Graph Paper for Music
Notation software is powerful, but it forces decisions early: key, time signature, instrument, tempo. When you are still hunting for an idea, that friction gets in the way. Paper removes it. On graph paper you can invent your own system, mix notation styles on one page, and erase freely. The grid does the tedious spacing work automatically, so a beat is always the same width and a scale step is always the same height. That consistency is exactly what makes a musical sketch readable later.
Graph paper also matches how many people actually think about music. If you have ever used a "piano roll" in a digital audio workstation, you already think of notes as blocks on a grid: taller means higher, wider means longer. Graph paper is the analog version of that same mental model, and it works whether you are writing a string quartet, a synth line, a drum groove, or a four-chord song.
Building a Custom Staff
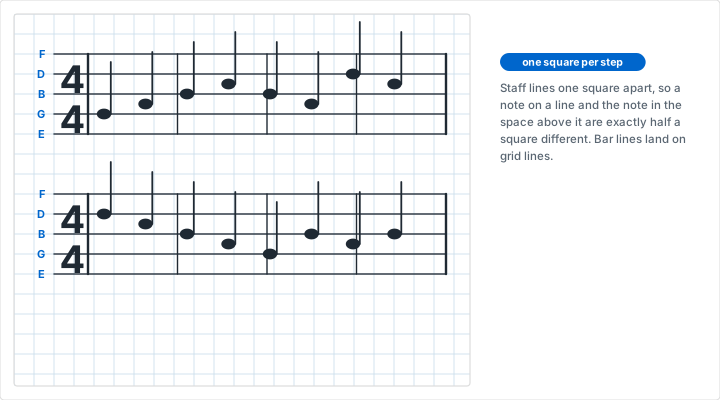
Standard music is written on a staff of five lines and four spaces. Pre-printed manuscript paper locks you into one staff size, but graph paper lets you build a staff at any scale you like. Pick a cell height and darken every other line, or every group of lines, to form the staff. A common approach on quarter-inch paper:
- Choose a two-square gap between staff lines so notes sit comfortably on lines and in spaces.
- Darken five evenly spaced horizontal lines to form the staff; leave the squares above and below for ledger lines.
- Use the vertical grid lines as beat divisions, so bar lines and note spacing stay even across the page.
- Leave a blank row between staves for lyrics, chord symbols, or fingerings.
Because you control the scale, you can make an oversized staff for a beginning student learning to place notes, or a compact one to fit a full arrangement on a single sheet. The vertical grid lines double as a rhythmic ruler: line up note heads with the columns and your spacing automatically reflects the beat.
Piano-Roll and Note-Grid Composing
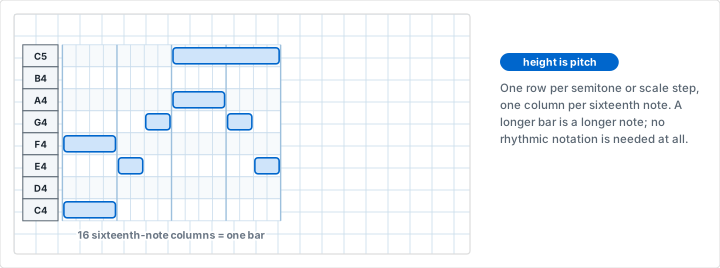
You do not need to read standard notation to write music on a grid. The piano-roll approach treats the vertical axis as pitch and the horizontal axis as time. Label the rows on the left with note names (C, D, E, and so on, or the keys of a piano), let each column be a subdivision of the beat, and fill in cells to place notes. A long note is a long horizontal bar; a chord is a stack of filled cells in the same column.
This system is wonderful for melody writing and for anyone coming to composition from electronic music. You can see the contour of a melody as a shape, spot when a line jumps too far, and copy a two-bar phrase by simply repeating a block of cells. It is also a natural bridge to software: what you draw on paper maps almost directly onto the piano-roll editor in any DAW. A custom grid with clearly numbered columns makes counting beats effortless.
Guitar and Bass Tablature
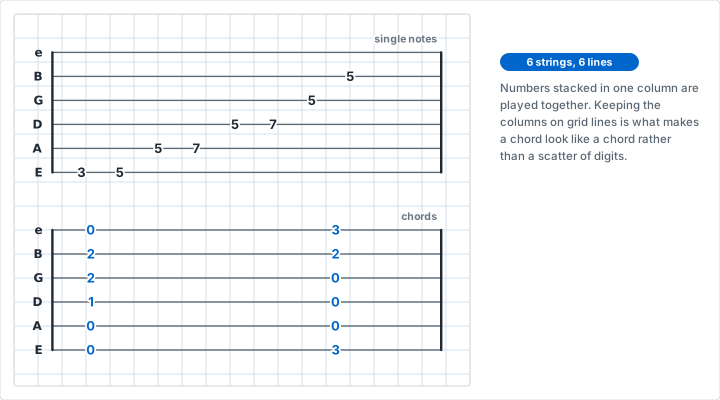
Tablature is a grid by nature, which makes graph paper ideal for it. For guitar, use six horizontal lines to represent the six strings; for bass, use four. Each vertical column is a moment in time, and you write the fret number on the appropriate string line. Graph paper keeps the columns evenly spaced so rhythm stays readable, and the horizontal lines give you consistent string spacing without drawing them freehand.
Chord diagrams work well on graph paper too. A small block of squares becomes a fretboard: vertical lines for strings, horizontal lines for frets, and dots in the cells for finger positions. Sketching a progression as a row of these little grids lets you plan voice leading and see how your hand moves up and down the neck. Keep a legend for hammer-ons, pull-offs, slides, and bends so your tab is unambiguous when you return to it.
Rhythm, Drums, and Step Sequencers
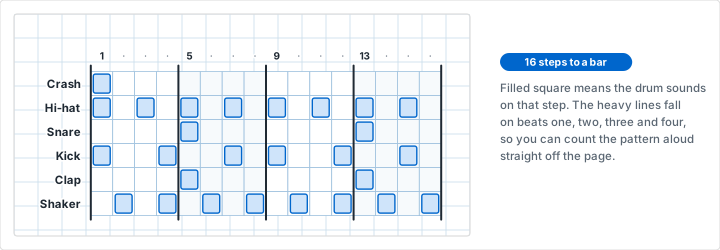
Rhythm is where the grid truly shines. A drum pattern is essentially a spreadsheet: instruments down the side, time across the top. Label rows for kick, snare, hi-hat, and cymbals, divide each bar into columns (sixteen columns for sixteenth notes in common time), and mark an X in a cell when that drum hits. The result is a step sequencer on paper, identical in logic to the grids in drum machines and beat-making apps.
This grid-based rhythm notation is far easier for many people than traditional stems and flags. You can instantly see the density of a groove, line up a snare backbeat against the kick, and try variations by erasing and re-marking a few cells. Producers often sketch beats this way before opening any software, and drummers use it to work out and share patterns without formal notation. The same approach handles polyrhythms cleanly: give each rhythm its own row and the shared column grid keeps everything aligned in time.
Mapping Song Structure and Arrangement
Zoom out from individual notes and graph paper becomes an arrangement tool. Let each column represent a bar or a section (intro, verse, chorus, bridge), and each row represent an instrument or track. Shade the cells where each part plays and you have an arrangement map: a single view of when the bass enters, where the strings drop out, and how the energy builds toward the final chorus.
This kind of chart is invaluable for songwriters and producers planning a full track. It shows the arc of a song at a glance, exposes sections that are too sparse or too crowded, and works as a shared reference when arranging for a band. Add a row at the top for the song timeline and a column at the left for dynamics, and the same grid captures structure, instrumentation, and intensity all at once.
Making Music Theory Visible
Graph paper is a quiet teaching tool for music theory. Interval patterns, scale shapes, and chord spellings all become visual when you plot them on a grid. Map a chromatic scale across twelve columns and you can see major and minor scales as repeating patterns of steps. Chart the intervals of a chord as vertical distances and the difference between a major and minor third stops being an abstraction and becomes something you can measure with your eye.
Some relationships are inherently circular, and there a different grid helps. The circle of fifths, the twelve chromatic pitches, and repeating rhythmic cycles all sit naturally on polar graph paper, where concentric rings and radial spokes turn cyclic ideas into a picture. And because human pitch perception is logarithmic -- every octave doubles frequency -- the mathematics behind tuning and harmony connects directly to logarithmic graph paper, the same tool scientists use to plot quantities that span many orders of magnitude.
Teaching Kids and Beginners
For young students and adult beginners, the blank staff can be intimidating. Graph paper lowers the barrier. Oversized homemade staves give small hands room to draw note heads accurately. Piano-roll grids let a child compose a melody by coloring squares before they can read a note. Rhythm grids teach counting and subdivision with nothing more than an X in a box. Because the grid enforces even spacing, a beginner's first attempts look organized and legible, which builds confidence quickly. Many music teachers keep printed grids on hand precisely because they meet students where they are.
Choosing Grid Size and Paper
The right grid depends on what you are writing. A few guidelines:
- Melodies and staves: quarter-inch (or 5 mm) squares give enough room for note heads and lyrics without wasting space.
- Piano-roll and drum grids: a slightly larger cell keeps rows labeled and easy to fill in by hand; number the beat columns for quick counting.
- Full arrangements: a finer grid, or a larger sheet, lets you fit many bars and tracks on one page. Landscape orientation suits timelines that run long.
- Tablature: match the horizontal line spacing to your handwriting so fret numbers do not crowd the string lines.
- Cyclic theory diagrams: reach for polar paper for the circle of fifths and rhythmic cycles.
Because you are generating the paper yourself, you can print exactly the grid the piece needs and make as many copies as you want. A dot grid is a good middle ground when you want alignment guides without heavy lines competing with your notation.
Tips for Cleaner Musical Sketches
- Work in pencil. Music ideas change constantly, and a good eraser is your best composing tool.
- Always write a small legend for any symbols you invent, so a sketch still makes sense months later.
- Number your bars and beats along the top edge; it makes rehearsal, revision, and transcription far easier.
- Use color to separate parts or voices on a dense arrangement grid.
- Keep a consistent left-hand column for labels (note names, strings, drums) so every row is unambiguous.
- Photograph finished sketches before erasing, so you never lose a version you might want back.
Ready to Write Your Next Song?
Generate custom graph paper for your music. Choose your grid spacing, paper size, and even polar grids for cyclic theory diagrams, then print as many copies as you need.
Generate Custom Graph PaperRelated Resources
- How to Choose the Right Grid Size
- Polar Graph Paper -- for the circle of fifths and rhythmic cycles
- Logarithmic Graph Paper -- the math behind pitch and frequency
- Dot Grid Paper -- subtle alignment guides for notation
- Creating Pixel Art on Graph Paper -- another one-cell-at-a-time craft
- Graph Paper and the Analog Revival
- Professional Printing Tips